Virtualization, Cloud, Infrastructure and all that stuff in-between
My ramblings on the stuff that holds it all together
Category Archives: Geeky
16Gb RAM upgrade for MacBook Pro
Posted by on December 13, 2011
I have a 2011 13” MacBook Pro (Thunderbolt model) which is my main workhorse machine, I wanted a highly specified machines that was very portable and this absolutely fitted the bill (if it was VERY expensive) – buy the best, or buy twice as someone I know always says, and I’ve come round to his way of thinking!
When I ordered it the maximum amount of RAM you could order was 8Gb, Crucial have since released a 16GB upgrade (2 x 8GB SODIMM modules) – you can find out if your MBP can take it from this link
The following is what I ordered..
- CT2625478 16GB kit (8GBx2), 204-pin SODIMM Upgrade for a Apple MacBook Pro (13-inch, Late 2011) System £242.99 (Ex. VAT)
- CTSCRDRVRPH0 Screwdriver for Upgrading Notebook Memory £2.49 (Ex. VAT)
Obviously you don’t have to order the screwdriver but I needed a new one and it perfectly fitted the small screws to remove the underside of the case.
It’s very simple to fit, just remove the screws from the underside, making sure you note which hole they match up to as there are two different lengths, pop out the existing modules and screw it back together. done.
And, the finished result..

Very cool as I can now use Fusion 4 to run a multi node nested ESXi cluster (ala vTARDIS), Hyper-V and my normal Windows 7 VM all on a single machine, mine also has an SSD so it’s about as fast as it can get with that workload.
Crucial probably isn’t the cheapest place to get these from, but by the time you factor in your effort tracking down cheaper modules and running the risk that you may have to return them if they turn out to be incompatible just isn’t worth the bother IMHO.
They seem to have a 5% discount offer which may or may not work in your country – the code is BOOKFIVE which applies to DRAM, solid-state drives and a variety of accessories.
This sticker was part of an overall upgrade process, and was secondary in importance to the following sticker for anyone who regularly reads pistonheads.com ![]()

Kindle 3 Rocks
Posted by on February 15, 2011
I recently received an Amazon Kindle 3 as a belated leaving present from my old team, which was very kind.
I’ve been using it for a couple of weeks now and I’ve been very impressed, I have been a long-term die-hard dead-tree book fan and have a lot of tech-books at home so I didn’t think I would easily convert to the electronic format.

I also have had an iPad for a while, and it’s transformed (dominated!?) the way my family use the Internet and computers at home so as a net-result I don’t take the iPad away with me on trips or in my bag as they would probably suffer withdrawal symptoms ![]() .
.
The iPad is an excellent multi-media device and also has the Kindle application so can do as much as the dedicated Kindle device itself, however it’s also 4 times as expensive as a Kindle and I am that bit more conscious about breaking/losing it whilst chucking it around the country and the Kindle screen isn’t as reflective as the iPad.
I’m sure it’s not just novelty factor but I’ve actually read some fiction, non-related work books on it – which is something I’ve not managed with paper books for some time.
What I like about the Kindle;
- Very lightweight and small
- Cheap device
- Kindle software app for Mac, iPad, PC to access from multiple devices (and an eBook license to match)
- built-in 3G as a back-up (and no subscription required
- Calibre app for side-loading PDFs and converting eBook formats
- Lots of free classic eBooks on the Web
- very readable screen in all type of light
What I don’t like about the Kindle;
- More books need to be released to the Kindle, not everything has a Kindle option – I assume there is some rights, publisher issue here so isn’t entirely in Amazon’s control but Kindle with the built-in book store is good for impulse-buy of books, which I am sure publishers would like
- I would love a dead-tree + eBook Purchase version option, I’d happily pay an extra 20% over the cost of the paperback to have this, then I have a copy for my bookshelf and a copy to take on the road that I can start reading as soon as I purchase.
- It’s a bit slow, but I can take the trade-off against super-long battery life.
- You need a case for it, which adds to the cost, I’ve not bothered with one with a built-in light
- it’s almost criminal that Amazon want to charge a subscription to read blogs on the device, Calibre sort of seems to resolve that.
- It really needs an RSS reader app, leveraging the built-in 3G/WiFi (but maybe Amazon won’t allow that)
So, go and buy one… that’s my recommendation.
Be your own Big Brother
Posted by on January 25, 2011
During my work and personal life I’ve travelled around a lot – sometimes by car sometimes flying, I’ve always held an odd fasincation in being able to visualise where I have been over time and tot up just how far I’ve travelled in a period.
When I started cycling again a couple of years ago I found a neat solution for my cycle routes – you can read a bit more about that here
I really like the Instamapper solution and the fact it has a Blackberry app (Android and iPhone too I believe) so when I recently got a new Blackberry with a built-in GPS, so I thought it would be an interesting experiment to track my movements 24/7 so I could see where I have been as I no longer had a dependency on an external bluetooth GPS.

It definitely impacts battery life, I get about 24-36hrs out of a single charge on my BB with it running compared to at least 60 without it running.
It automatically starts the GPS at boot so you won’t forget to switch it on, which is a handy feature.
The Instamapper website is great; it lets you export tracks in a format that works with Google Earth and includes timestamps so you can use the replay feature to watch a sped-up version of your trip – especially funny if you got lost somewhere in the car as you can gradually watch you circling and missing your destination ![]()

the web-service simply logs GPS co-ordinates, speed and timestamps from your device and you can split them down into individual “tracks” if you know the start/end times of your journey – I use a 5min sample frequency and the updates to the web-service are buffered if you don’t have a network connection.

Below are some example tracks; the top one is across a month and included a family holiday to Euro Disney via Eurostar, multiple trips to and from customers and the office and a trip to Derry in Ireland.


(Phone was switched off on the plane, but maybe leaving the GPS running might be an interesting, if illegal experiment ![]() )
)
If you are similarly minded I’d encourage you to check out Instamapper, and best of all – it’s FREE! ![]()
OS X Expose Clone for Windows
Posted by on November 18, 2009
One of the main things I miss as I switch between a Mac and PC is the lack of decent multi-window manager support in Windows – alt-tab and win-tab are great but I find them cumbersome.
A particular bug bear of mine is if you have to manage multiple terminal services sessions to servers/virtual machines, they are manageable when they are windowed. but if you have a low-screen resolution or small monitor its often more comfortable to use the TS sessions in full-screen mode, this brings with it some window confusion and the annoying pin/not pinned title bar to switch screens using the mouse.
OS X has an excellent feature called Expose which allows you to setup hot corners on the screen or hot-keys which, when activated zoom out to a thumbnail view of all your open application windows – and you can then click on the one you want.
it also has great support for multiple monitors, and stacks of monitors – if you’ve not used Expose/Spaces before check out Steve Jobs introducing it in this video (and take the Mac Fanboy whooping with a pinch of salt :))
Now – it’s not exactly the same but I’ve been using an application called Switcher to accomplish some of what OS X can do – below is a screenshot of all my open application windows when I touch a hot-corner

Clicking on the desktop wallpaper in the background reverts the display to just the desktop (ala show desktop from the taskbar). the most important feature for me is the full-screen TS session – you can have as many of these open as you want and you can just browse and pick them by clicking on the appropriate thumbnail without having to hunt around win-tab’ing via the keyboard or taskbar.
it also has a large range of customisation options as shown below

Easy.
Unfortunately it seems like Switcher isn’t actively developed any more 😦 but it is free – so open to better alternatives but it works for me with the occasional crash
You can download Switcher for free with instructions from http://insentient.net/Switcher/Overview.html
VMware ESX 5
Posted by on August 7, 2009
Ok, so vSphere (ESX4) has only just been released, but what would you like to see in the next major version? Hyper V R2 will be out soon, and I would expect it’s successor within a further 18 months. whilst vSphere is a technically better product now Microsoft are going to be throwing a significant amount of resource at building up the Hyper V product line so VMware need to keep innovating to be significantly ahead.
As the VMware vendor and partner ecosystem grows will it stifle growth in the core product? – I see this happening with Microsoft – they don’t want to produce an all singing and dancing core product as there are literally thousands of ISV’s that they don’t necessarily want to put out of business; so Microsoft core products are “good-enough” but for more advanced features you turn to an ISV (think Terminal Services & Citrix)
So, open question really – here’s my starter for 10 – What would you like to see in ESX 5?
Host Based Replication
SAN storage brings a single point of failure; even with all the best HA controllers and disk arrangements, it’s still one unit –human error or a bad firmware could corrupt all your disks – you can buy a 2nd one and do replication but that’s expensive (twice as expensive infact) and failover can require downtime (automated with SRM etc.).. and what if you need to physically move it to another datacentre? that’s a lot of risk.
In this previous post I proposed a slightly different architecture, leveraging the FT features for a branch office solution – that same model could mean a more distributed architecture with n+1, 2 or 3 x ESX nodes running FT’d VMs for high availability on cheap, commodity hardware – using DAS storage and replicating over standard IP networks.
if you look at companies like Amazon, Google etc. their cloud platforms leverage virtualization (Xen) but I would bet they don’t rely on enormous SANs to run them, they use DAS storage and replication, they expect individual (or even datacentre) failures and can work around them by keeping multiple copies of everything – but they don’t have an expensive storage model – they use cheap commodity kit and provide the HA in the software – with some enhancements the FT feature could provide an equivalent;
Host based replication also makes long-distance clustering more realistic – relying on plain old IP to do the replication, rather than proprietary SAN-SAN replication (previous thoughts on this here)
Microsoft have already moved in this direction with core products like Exchange and SQL, Exchange CCR and SQL Mirroring are pure-IP based replication technologies that address the issues with traditional single copy clusters
Now, with VMware being owned by EMC I could see this as being something of a problem but I hope they can see the opportunity here, you can achieve some of this using storage virtual machines (like Openfiler+Replication in a VM, or Datacore).
Stateless ESX Nodes
A mode where nodes can be PXE booted (or from firmware like ESXi) and have their configurations assigned/downloaded – no manual installs, all DHCP (or reserved DHCP) addressing
when combined with cheap, automatically provisioned and managed virtualization nodes with commodity DAS storage, you could envisage the following scenario..
- Rack a new HP DL360g7 with ESX 5i server on a USB key (or PXE booted), attach power, network and walk away
- it registers itself at boot time with a management node(s) downloads its configuration
- based on dynamically assigned HA policy it replicates copies of virtual machines from elsewhere in the ESX cloud, once up to speed it becomes a secondary or tertiary copy.
You can imagine a policy-driven intelligent load and availability controller (vCenter 5) which ensures there are always copies of a VM on at least 2 or 3 physical machines in more than one location
Distributed Processing
This is getting a bit sci-fi, but the foundations in infrastructure and technology are being laid now with high-speed interconnects like Infiniband…
With more operating systems and applications starting to optimize for multi-core and hot-add CPU and memory, a very advanced hypervisor scheduler combined with very fast host interconnects like Infiniband or 10GbE could see actual CPU load and memory access being distributed across multiple physical hypervisors;
For example; imagine a 24 vCPU SQL Server virtual machine with 1Tb of vRAM having it’s code executed across 10 quad-CPU physical hosts. effectively multi-core processing but across multiple physical machines – moving what currently happens within the a single physical CPU and bus across the network between disparate machines.
The advantage of this is that developers would only have to write apps that work within current SMP technology – the hypervisor masks the complexity of doing this across multiple hosts, CPUs and networks with a high degree of caching and manages concurrency between processes.
You could combine this with support for hot-add CPU and memory features for apps that could scale massively on-demand and then down again, without having to engineer complex layer 7 type solutions.
Anyway, and please note this is pure personal conjecture rather than anything I have heard from VMware or elsewhere – enough from me; what would YOU like to see…?
Biking for Geeks
Posted by on June 29, 2009
A slight diversion from the usual topics, over the last year I have been getting back into cycling after a long break. Mainly to regain my overall fitness but also as a social thing with our daughter who loves cycling.
Whilst I enjoy cycling, like any geek I need an extra hook to keep me interested and track my progress against my goals, following some advice from colleagues who are really into running I looked into the Suunto range of products.
My list of wants for this personal training “solution” included
- Mileage & altitude logging (being as I typically cycle where there are a lot of hills)
- EPOC, energy consumption, heart rate
- Temperature
- GPS route logging so I can view routes on Google Maps etc.
I ended up at the Suunto T6C wrist top computer which comes with the heart rate belt, data cable etc.
|
ASIN: B0013LKSSO |
 Suunto T6C Heart Rate Monitor – Black: Sports & Leisure
Suunto have an active user forum with people sharing both technical and training tips, it wasn’t cheap but is widely regarded as “the business” and I increased the RoI 🙂 as I needed a normal watch – it’s not the smallest of watches, but it’s workable for me.

The Suunto range works using wireless “pods” which are battery operated sensors that record data including speed, heart rate, cadence etc. which are logged on the watch memory, the watch itself has built in sensors and logging for environmental items like temperature & altitude.
It doesn’t however satisfy the GPS route logging want; there is a GPS pod for the Suunto range however when paired with the T6C it just functions to monitor speed rather than allowing data logging and anyway Suunto bike pod provides a better solution for cycling.
Suunto also have the X9i
|
ASIN: B000WOZY82 |
 Suunto X9i: Sports & Leisure
and the newer X10 model
|
ASIN: B001DCEKXW |
 Suunto X10: Sports & Leisure
Both of these can do data logging but they were out of my price range at the time and didn’t get very good reviews for performance and build quality, whereas the T6C got good feedback all round.
I started with the watch itself which comes with the heart rate belt, later on I added the road bike pod (Suunto Road bike POD) and a cadence pod (Suunto Cadence Pod – For Cycling
)
I did also buy the GPS pod (Suunto GPS POD) which is how I discovered it’s lack of the route logging features I required 😦 – it’s now in reserve for a future foray into running.
The watch comes with a USB cable to download the logged data to a PC using the Suunto provided software (Suunto Training Manager); this is freely downloadable and allows you to analyze the data; there is also a wireless USB receiver (Suunto PC POD) if you don’t want to use the cable or have a more complicated real-time coaching requirement for multiple people (i.e professional coach)
The following screenshots are from the Suunto Training Manager application.


There is also some commercial software called FirstBeat Athlete which comes well recommended and takes a more active coaching approach whereas the Suunto Training Manager is more about allowing you to analyze your performance retrospectively although have not tried it yet (2-week evaluation copy here)
This is the road bike pod
|
ASIN: B000JL08NO |
 Suunto Road bike POD: Sports & Leisure

It records speed, and thus distance travelled – my hybrid bike has quick change wheels so it replaces the standard front wheel skewer and works with a magnet on the spokes; Suunto also do another version of this sensor for bikes without quick change wheels (Suunto Bike POD) just be sure to check the fork size is compatible as the non road bike mounts to the front fork.
I chose the road bike pod as it was a neater solution and there was less chance of the sensor being knocked off whilst the bike is being transported around.
This the the cadence sensor (don’t confuse it with the standard Suunto bike pod; both are of a similar design but do fundamentally different things)
|
ASIN: B0013LNYFS |
 Suunto Cadence Pod – For Cycling: Sports & Leisure
It works by attaching a small magnet to the inside of the pedal crank and a sensor mounted on the frame with supplied cable ties, cadence is an important part of monitoring your training – particularly when cycling as it’s easy to coast down hills 🙂
I have found the heart rate belt fine to use, some people have trouble with it slipping off but I’ve not had any issues, they can break/wear out but there are spares available.
All of the sensor pods have flat type batteries which are user-replaceable.
Some further resources are here
Suunto manual download page
Suunto training guides
The last part of my list of “wants” was GPS route tracking so I can record my cycle routes and store them for reference or working out where I got lost, I wasn’t bothered about actual on-bike navigation just post-ride analysis.
Being as the Suunto offerings I went with don’t have GPS route logging capabilities I looked at several standalone route logging devices like this and this, but they all require data to be downloaded and converted into a mapping programme.
Being as I always carry my mobile phone (Blackberry Pearl 8120) when I cycle I wanted an integrated solution. The version of the Blackberry Pearl that I use can run Google Maps with cell location but it lacks a built-in GPS. as a result I looked for a Bluetooth GPS receiver and some software to run on the Blackberry to log and possibly automatically upload data.
After a lot of experimentation I found Instamapper (www.instamapper.com, blog) which is an online service that integrates with Google Maps and works by receiving GPS data from client software running on a variety of handsets.
The clever part is that you never need to download/upload data to the service, the client buffers and uploads data automatically whilst the application is running, I found some problems with this initially that when the handset locked the application was terminating – this forum post fixed it for me and it has worked 100% ever since.
You can analyse the data online via the instamapper website, but it also gives you the option to export the data out to a variety of formats, including a .KMZ file which works with Google Maps

You can then view tracks like this in Google Earth


My bike is an Iron Horse Transit 3.0 which is a hybrid bike, I spent a lot of time researching which bike to buy and was looking for a Marin or Specialized bike but to be honest I was offered a good deal on this at an Evans Cycles warehouse sale last year and it was too good a deal to turn down.

It’s a great bike and I have clocked up nearly 1,000 miles in the last year it can cope well enough with a mix of road and gravel/forest trail type conditions – it’s not an off-road bike by any means as it has pretty slim tyres but its pretty versatile and light and well suited to the type of riding I do (mainly road with occasional trail/park) the riding position is excellent for heavy traffic as it’s quite upright and the flat handlebars make manoeuvring in traffic easy.
We have a 3-year old who likes to come along on rides, for this I have one of these seats.
 Hamax Kiss One Point Fitting Rear Mounted Seat Black: Sports & Leisure
It mounts to the bracket shown below which I just leave on my bike all the time. The seat is quick and easy to get on and off the bracket and is secure when on, the metal mounts offer a reasonable level of suspension for our child when sitting in the seat and stops the worst of shocks from the road.


I did look at some of the Weeride type seats but didn’t like the proximity of the childs head to my chin/teeth 🙂 especially over bumps! although I can see they would be better for weight distribution and balance.
As an added bonus if you need to do any shopping the child seat can hold the shopping whilst you ride home (assuming you don’t take the child with you of course :)).
I hope that was useful to someone, my inspiration for looking into this originally came from the following links
http://www.ultrarob.com/blog/2007/11/bike-ride-mapping-with-gps.php
http://www.nickfessel.com/gmaps/burlingtonbikeRide.html
http://www.semifluid.com/?p=80
http://www.singletracks.com/blog/mtb-trails/topo-maps-in-google-earth-map-your-bike-trails/
vSphere RC RAM Under VMware Workstation: How Low Can You Go?
Posted by on May 8, 2009
Getting ESX (in it’s various versions) to run under VMware Workstation has proven to be a very popular article on this blog, if you are a consultant who has to do product demos of VI3/vSphere or are studying for your VCP it’s a very useful thing to be able to do on your own laptop rather than rely on remote connections or lugging around demo kit.
Good news; the RC build of vSphere will boot under the latest VMware Workstation build (6.5.2) without any of the .vmx hackery you had to do in previous versions and it seems quite fast to boot.
Bad news: the RC build of vSphere needs at least 2GB of RAM to boot, this is a problem for a laptop with 4GB of RAM as it means you can only really run one at a time.
Luckily: Duncan Epping (or VCDX 007; licenced to design :)) has discovered how you can hack the startup script to allow it to run in less than 2GB of RAM – details here, this isn’t officially supported – but it does work.
In the interests of science I did some experimentation with VM’s with various amounts of decreasing RAM to see what the bare minimum RAM you can get away with for a VM’d version of vSphere RC.
The magic number seems to be 768Mb of RAM, if you allocate less than this to the VM then it results in a Purple Screen of Death (PSOD) at boot time.

Note – this may change for the GA/RTM final version – but these are my findings for RC
The relevant section of my /etc/vmware/init/init.d/00.vmnix file looks like the following (note it won’t actually boot with 512mb assigned to the VM)

Some screen captures of the vSphere RC boot process below


And finally the boot screen once it’s finished – it takes 2-3 mins with 768Mb of RAM on my laptop to get to this boot screen.

I am doing this on a Dell D620 with 4Gb RAM and Intel VT enabled in the BIOS, running Vista x86 and VMware Workstation v6.5.2 build 156735


I haven’t tried, but I assume I can’t power on VM’s under this instance of vSphere but I can connect them to a vCenter 4 machine and practice with all the management and configuration tools.
Happy tweaking…
New Home Lab Design
Posted by on April 2, 2009
I have had a lab/test setup at home for over 15 years now, it’s proven invaluable to keep my skills up to date and help me with study towards the various certifications I’ve had to pass for work, plus I’m a geek at heart and I love this stuff 🙂
over the years it’s grown from a BNC based 10mbit LAN running Netware 3/Win 3.x, through Netware 4/NT4, Slackware Linux and all variants of Windows 200x/RedHat.
Around 2000 I started to make heavy use of VMware Workstation to reduce the amount of hardware I had (8 PCs in various states of disrepair to 2 or 3 homebrew PCs) in latter years there has been an array of cheap server kit on eBay and last time we moved house I consolidated all the ageing hardware into a bargain eBay find – a single Compaq ML570G1 (Quad CPU/12Gb RAM and an external HDD array) which served fine until I realised just how much our home electricity bills were becoming!
 hot & cold aisles, mmm")
Note the best practice location of my suburban data centre, beer-fridge providing hot-hot aisle heating, pressure washer conveniently located to provide fine-mist fire suppression; oh and plenty of polystyrene packing to stop me accidentally nudging things with my car. 🙂
I’ve been using a pair of HP D530 SFF desktops to run ESX 3.5 for the last year and they have performed excellently (links here here and here) but I need more power and the ability to run 64 bit VMs (D530’s are 32-bit only) I also need to start work on vSphere which unfortunately doesn’t look like it will run on a D530.
So I a acquired a 2nd-hand ML110 G4 and added 8Gb RAM – this has served as my vSphere test lab to-date, but I now want to add a 2nd vSphere node and use DRS/HA etc. (looks like no FT for me unfortunately though) – Techhead put me onto a deal that Servers Plus are currently running so I now have 2 x ML110 servers 🙂 they are also doing quad-core AMD boxes for even less money here – see Techhead for details of how to get free delivery here

In the past my labs have grown rather organically as I’ve acquired hardware or components have failed; being as this time round I’ve had to spend a fair bit of my own money buying items I thought it would be a good idea to design it properly from the outset 🙂
The design goals are:
- ESX 3.5 cluster with DRS/HA to support VM 3.5 work
- vSphere DRS/HA cluster to support future work and more advanced beta testing
- Ability to run 64-bit VMs (for Exchange 2007)
- Windows 2008 domain services
- Use clustering to allow individual physical hosts to be rebuilt temporarily for things like Hyper-V or P2V/V2P testing
- Support a separate WAN DMZ and my wireless network
- Support VLAN tagging
- Adopt best-practice for VLAN isolation for vMotion, Storage etc. as far as practical
- VMware Update manager for testing
- keep ESX 3/4 clusters seperate
- Resource pool for “production” home services – MP3/photo library etc.
- Resource pool for test/lab services (Windows/Linux VMs etc.)
- iSCSI SAN (OpenFiler as a VM) to allow clustering, and have all VMs run over iSCSI.
The design challenges are:
- this has to live in my garage rack
- I need to limit the overall number of hosts to the bare minimum
- budget is very limited
- make heavy re-use of existing hardware
- Cheap Netgear switch with only basic VLAN support and no budget to buy a decent Cisco.
Luckily I’m looking to start from scratch in terms of my VM-estate (30+) most of them are test machines or something that I want to build separately, data has been archived off so I can start with a clean slate.
The 1st pass at my design for the ESX 3.5 cluster looks like the following

I had some problems with the iSCSI VLAN, and after several days of head scratching I figured out why; in my network the various VLANs aren’t routable (my switch doesn’t do Layer 3 routing). For iSCSI to work the service console needs to be accessible from the iSCSI VKernel port. In my case I resolved this by adding an extra service console on the iSCSI VLAN to get round this problem and discovery worked fine immediately


I also need to make sure the Netgear switch had the relevant ports set to T (Tag egress mode) for the VLAN mapping to work – there isn’t much documentation on this on the web but this is how you get it to work.

The vSwitch configuration looks like the following – note these boxes only have a single GbE NIC, so all traffic passes over them – not ideal but performance is acceptable.


iSCSI SAN – OpenFiler
In this instance I have implemented 2 OpenFiler VMs, one on each D530 machine, each presenting a single 200Gb LUN which is mapped to both hosts
Techhead has a good step-by-step how to setup an OpenFiler here that you should check out if you want to know how to setup the volumes etc.
I made sure I set the target name in Openfiler to match the LUN and filer name so it’s not too confusing in the iSCSI setup – as shown below;
if it helps my target naming convention was vm-filer-X-lun-X which means I can have multiple filers, presenting multiple targets with a sensible naming convention – the target name is only visible within iSCSI communications but does need to be unique if you will be integrating with real-world stuff.

Storage Adapters view from an ESX host – it doesn’t know the iSCSI target is a VM that it is running 🙂

Because I have a non routed L3 network my storage is all hidden in the 103 VLAN, to administer my OpenFiler I have to use a browser in a VM connected to the storage VLAN, I did play around with multi-homing my OpenFilers but didn’t have much success getting iSCSI to play nicely, it’s not too much of a pain to do it this way and I’m sure my storage is isolated to a specific VLAN.
The 3.5 cluster will run my general VMs like Windows domain controllers, file servers and my SSL VPN, they will vMotion between the nodes perfectly. HA won’t really work as the back-end storage for the VM’s live inside an OpenFiler, which is a VM – but it suits my needs and storage vMotion makes online maintenance possible with some advanced planning.
Performance from VM’d OpenFilers has been pretty good and I’m planning to run as many as possible of my VMs on iSCSI – the vSphere cluster running on the ML110’s will likley use the OpenFilers as their SAN storage.
This is the CPU chart from one of the D530 nodes in the last 32hrs whilst I’ve been doing some serious storage vMotion between the OpenFiler VM’s it hosts.


That’s it for now, I’m going to build out the vSphere side of the lab shortly on the ML110’s and will post what I can (subject to NDA, although GA looks to be close)
Public Transport Layer for Google Maps
Posted by on January 14, 2009
This is quite a cool idea, a 3rd party has created a Google Maps overlay for public transport for many major cities. I live in London and this is especially useful as a visual aid to getting about (although I do know my way around pretty well) as you can see the mix of tube routes overlaid onto the streets – as almost all trips will be a tube/walking combination it gives a quick way to visualise where you are going.
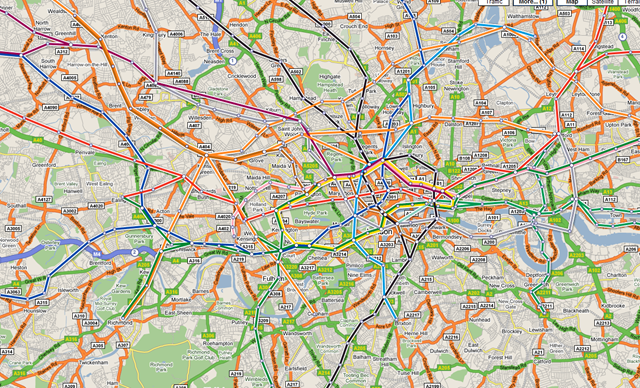
Would be especially useful if this would work with the Blackberry Google Maps application that I use all the time but I can’t see a way to do that, overground rail networks and maybe bus routes would also be useful – but that would need a bit of detailed input from TfL (Transport for London) I would guess.
Manually Upgrading a Blackberry Pearl to 4.5, BIS & BES
Posted by on January 14, 2009
I have a Blackberry 8100 Pearl, it’s a great phone and I use it for both my corporate email via BES and my personal email via BIS so I have everything I need coming to one place (if you don’t know how to do this your BB will probably have an e-mail setup wizard where you can attach a number of different email services to your carrier’s BIS – on newer devices BIS and BES can co-exist, IIRC there used to be a specific BIS /or/ BES firmware – this no longer seems to be the case).
Because its attached-to/”owned” by a corporate BES I cannot install the normal 4.5 OS upgrades from my carrier myself as the Blackberry desktop software refuses to allow the 4.5 upgrade and says I have to have an administrator do it on my behalf or provide it over the air (OTA). Now, they are busy chaps and have better things to do and I really wanted HTML email support on my BB ASAP so a bit of unsupported DIY was in order;
Note: I actually did this during the xmas break so this is re-constructed from my memory – remember you do this at your own risk, particularly if your BB is supported by your internal IS department.. don’t make their lives difficult if you don’t know how to help yourself – Also, I don’t profess to be a Blackberry expert but I know enough to get by and work things out.
-
- I located the downloadable OS upgrade from my carrier
- I did a full backup of up my blackberry using the BB desktop software
- As my own Blackberry desktop software recognises my BB as being owned by a BES it won’t allow the upgrade via USB to the new firmware.
- I found a 2nd computer and installed the Blackberry desktop suite 4.7 but didn’t pair it up with my Blackberry {yet}
- I did a wipe of my BB handheld (via the Options/Security Options/General Settings UI. – warning this does wipe everything and took about 2hrs on my BB – note on mine it didn’t erase the contents on my microSD memory card; your mileage may vary and if you enforce encryption on external cards via policy then you may be unable to access the contents so best to back it up as well. in my case it has just a few un-important photographs from the camera stored on it.
- At this point I plugged the clean BB Pearl into the 2nd computer and paired it and upgraded the firmware from 4.2 to 4.5, which was pretty straightforward but took a couple of hours to complete.
- Once upgraded it was a clean BB, for reasons I don’t quite understand it tried to do an enterprise activation but failed, I restored my backup over the top of the clean phone and all my apps and data came back and the BES enterprise activation succeeded.
- I now had HTML email support via BES (as the back-end supported it)
- to get HTML email support for my personal email account via BIS I had to use the provisioning applet to have my carrier re-send the BIS service books, once complete it worked perfectly (more discussion on this here)
Once completed I garnished with a fresh looking theme from here, and it’s been more stable than ever since and I have nice, HTML formatted email rather than a mess of URL’s!

