Virtualization, Cloud, Infrastructure and all that stuff in-between
My ramblings on the stuff that holds it all together
Category Archives: Home Network
8 Node ESXi Cluster running 60 Virtual Machines – all Running from a Single 500GBP Physical Server
Posted by on February 25, 2010
I am currently presenting a follow-up to my previous vTARDIS session for the London VMware Users Group where I demonstrated a 2-node ESX cluster on cheap PC-grade hardware (ML-115g5).
The goal of this build is to create a system you can use for VCP and VCDX type study without spending thousands on normal production type hardware (see the slides at the end of this page for more info on why this is useful..) – Techhead and I have a series of joint postings in the pipeline about how to configure the environment and the best hardware to use.
As a bit of a tangent I have been seeing how complex an environment I can get out of a single server (which I have dubbed v.T.A.R.D.I.S: Nano Edition) using virtualized ESXi hosts, the goals were;
- Distributed vSwitch and/or Cisco NX100V
- Cluster with HA/DRS enabled
- Large number of virtual machines
- Single cheap server solution
- No External hardware networking (all internal v/dvSwitch traffic)
The main stumbling block I ran into with the previous build was the performance of the SATA hard disks I was using, SCSI was out of my budget and SATA soon gets bogged down with concurrent requests which makes it slow; so I started to investigate solid state storage (previous posts here).
By keeping the virtual machine configurations light and using thin-provisioning I hoped to squeeze a lot of virtual machines into a single disk, previous findings seem to prove that cheap-er consumer grade SSD’s can support massive amount of IOps when compared to SATA (Eric Sloof has a similar post on this here)
So, I voted with my credit card and purchased one of these from Amazon – it wasn’t “cheap” at c.£200 but it will let me scale my environment bigger than I could previously manage which means less power, cost, CO2 and all the other usual arguments you try to convince yourself that a gadget is REQUIRED.
So the configuration I ended up with is as follows;
| 1 x HP ML115G5, 8Gb RAM, 144Gb SATA HDD | c.£300 (see here) but with more RAM |
| 1 x 128Gb Kingston 2.5” SSDNow V-Series SSD | c£205 |
I installed ESX4U1 classic on the physical hardware then installed 8 x ESXi 4U1 instances as virtual machines inside that ESX installation

This diagram shows the physical server’s network configuration

In order for virtualized ESXi instances to talk to each other you need to update the security setting on the physical host’s vSwitch only as shown below;

This diagram shows the virtual network configuration within each virtualized ESXi VM with vSwitch and dvSwitch config side-side.

I then built a Windows 2008R2 Virtual Machine with vCenter 4 Update 1 as a virtual machine and added all the hosts to it to manage
I clustered all the virtual ESXi instances into a single DRS/HA cluster (turning off admission control as we will be heavily oversubscribing the resources of the cluster and this is just a lab/PoC setup

Cluster Summary – 8 x virtualized ESXi instances – note the heavy RAM oversubscription, this server only has 8Gb of physical RAM – the cluster thinks it has nearly 64Gb


I then built an OpenFiler Virtual Machine and hooked it up to the internal vSwitch so that the virtualized ESXi VMs can access it via iSCSI, it has a virtual disk installed on the SSD presenting a 30Gb VMFS volume over iSCSI to the virtual cluster nodes (and all the iSCSI traffic is essentially in-memory as there is no physical networking for it to traverse.

Each virtualized ESXi node then runs a number of nested virtual machines (VM’s running inside VMs)
In order to get Nested virtual machines to work; you need to enable this setting on each virtualized ESXi host (the nested VM’s themselves don’t need any special configuration)

Once this was done and all my ESXi nodes were running and settled down, I have a script to build out a whole bunch of nested virtual machines to execute on my 8-node cluster. the VM’s aren’t anything special – each has 512Mb allocated to it and won’t actually boot past the BIOS because my goal here is just to simulate a large number of virtual machines and their configuration within vCenter, rather than meet an actual workload – remember this is a single server configuration and you can’t override the laws of physics, there is only really 8Gb or RAM and 4 CPU cores available.
Each of the virtual machines was connected to a dvSwitch for VM traffic – which you can see here in action (the dvUplink is actually a virtual NIC on the ESXi host).


I power up the virtual machines in batches of 10 to avoid swamping the host, but the SSD is holding up very well against the I/O
With all 60 of the nested VMs and virtualized ESXi instances loaded these are the load stats

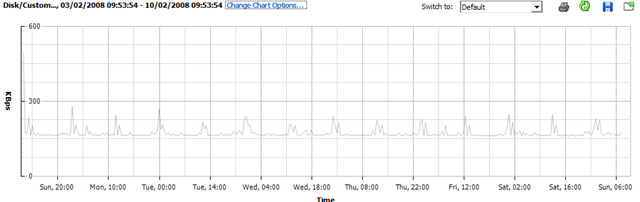
I left it to idle overnight and these are the performance charts for the physical host; the big spike @15:00 was the scripts running to deploy the 60 virtual machines

Disk Latency

Physical memory consumption – still a way to go to get it to 8Gb – who says oversubscription has no use? 🙂


So, in conclusion – this shows that you can host a large number of virtual machines for a lab setup, this obviously isn’t of much use in a production environment because as soon as those 60VM’s actually start doing something they will consume real memory and CPU and you will run out of raw resources.
The key to making this usable is the solid state disk – in my previous experiments I found SATA disks just got soaked under load and caused things like access to the VMFS to fail (see this post for more details)
Whilst not a production solution, this sort of setup is ideal for VCP/VCDX study as it allows you to play with all the enterprise level features like dvSwitch and DRS/HA that really need more than just a couple of hosts and VMs to understand how they really work. for example; you can power-off one of the virtual ESXi nodes to simulate a host failure and invoke the HA response, similarly you can disconnect the virtual NIC from the ESXi VM to simulate the host isolation response.
Whilst this post has focused on non-production/lab scenarios it could be used to test VMware patch releases for production services if you are short on hardware and you can quite happily run Update manager in this solution.
If you run this lab at home it’s also very power-efficient and quiet, there are no external cables or switches other than a cross-over cable to a laptop to run the VI Client and administer it; you could comfortably have it in your house without it bothering anyone – and with an SSD there is no hard disk noise under load either 🙂
Thin-provisioning also makes good use of an SSD in this situation as this screenshot from a 30Gb virtual VMFS volume shows.

The only thing you won’t be able to play around with seriously in this environment is the new VMware FT feature – it is possible to enable it using the information in this post and learn how to enable/disable but it won’t remain stable and the secondary VM will loose sync with the primary after a while as it doesn’t seem to work very well as a nested VM. If you need to use FT for now you’ll need at least 2 physical FT servers (as shown in the original vTARDIS demo)
If you are wondering how noisy it it at power-up/down TechHead has this video on YouTube showing the scary sounding start-up noise but how quiet it gets once the fan control kicks-in.
ML115 G5 Start-up Noise
Having completed my VCP4 and 3 I’m on the path to my VCDX and next up is the enterprise exam so this lab is going to be key to my study when the vSphere exams are released.
New Home Lab Design
Posted by on April 2, 2009
I have had a lab/test setup at home for over 15 years now, it’s proven invaluable to keep my skills up to date and help me with study towards the various certifications I’ve had to pass for work, plus I’m a geek at heart and I love this stuff 🙂
over the years it’s grown from a BNC based 10mbit LAN running Netware 3/Win 3.x, through Netware 4/NT4, Slackware Linux and all variants of Windows 200x/RedHat.
Around 2000 I started to make heavy use of VMware Workstation to reduce the amount of hardware I had (8 PCs in various states of disrepair to 2 or 3 homebrew PCs) in latter years there has been an array of cheap server kit on eBay and last time we moved house I consolidated all the ageing hardware into a bargain eBay find – a single Compaq ML570G1 (Quad CPU/12Gb RAM and an external HDD array) which served fine until I realised just how much our home electricity bills were becoming!
 hot & cold aisles, mmm")
Note the best practice location of my suburban data centre, beer-fridge providing hot-hot aisle heating, pressure washer conveniently located to provide fine-mist fire suppression; oh and plenty of polystyrene packing to stop me accidentally nudging things with my car. 🙂
I’ve been using a pair of HP D530 SFF desktops to run ESX 3.5 for the last year and they have performed excellently (links here here and here) but I need more power and the ability to run 64 bit VMs (D530’s are 32-bit only) I also need to start work on vSphere which unfortunately doesn’t look like it will run on a D530.
So I a acquired a 2nd-hand ML110 G4 and added 8Gb RAM – this has served as my vSphere test lab to-date, but I now want to add a 2nd vSphere node and use DRS/HA etc. (looks like no FT for me unfortunately though) – Techhead put me onto a deal that Servers Plus are currently running so I now have 2 x ML110 servers 🙂 they are also doing quad-core AMD boxes for even less money here – see Techhead for details of how to get free delivery here

In the past my labs have grown rather organically as I’ve acquired hardware or components have failed; being as this time round I’ve had to spend a fair bit of my own money buying items I thought it would be a good idea to design it properly from the outset 🙂
The design goals are:
- ESX 3.5 cluster with DRS/HA to support VM 3.5 work
- vSphere DRS/HA cluster to support future work and more advanced beta testing
- Ability to run 64-bit VMs (for Exchange 2007)
- Windows 2008 domain services
- Use clustering to allow individual physical hosts to be rebuilt temporarily for things like Hyper-V or P2V/V2P testing
- Support a separate WAN DMZ and my wireless network
- Support VLAN tagging
- Adopt best-practice for VLAN isolation for vMotion, Storage etc. as far as practical
- VMware Update manager for testing
- keep ESX 3/4 clusters seperate
- Resource pool for “production” home services – MP3/photo library etc.
- Resource pool for test/lab services (Windows/Linux VMs etc.)
- iSCSI SAN (OpenFiler as a VM) to allow clustering, and have all VMs run over iSCSI.
The design challenges are:
- this has to live in my garage rack
- I need to limit the overall number of hosts to the bare minimum
- budget is very limited
- make heavy re-use of existing hardware
- Cheap Netgear switch with only basic VLAN support and no budget to buy a decent Cisco.
Luckily I’m looking to start from scratch in terms of my VM-estate (30+) most of them are test machines or something that I want to build separately, data has been archived off so I can start with a clean slate.
The 1st pass at my design for the ESX 3.5 cluster looks like the following

I had some problems with the iSCSI VLAN, and after several days of head scratching I figured out why; in my network the various VLANs aren’t routable (my switch doesn’t do Layer 3 routing). For iSCSI to work the service console needs to be accessible from the iSCSI VKernel port. In my case I resolved this by adding an extra service console on the iSCSI VLAN to get round this problem and discovery worked fine immediately


I also need to make sure the Netgear switch had the relevant ports set to T (Tag egress mode) for the VLAN mapping to work – there isn’t much documentation on this on the web but this is how you get it to work.

The vSwitch configuration looks like the following – note these boxes only have a single GbE NIC, so all traffic passes over them – not ideal but performance is acceptable.


iSCSI SAN – OpenFiler
In this instance I have implemented 2 OpenFiler VMs, one on each D530 machine, each presenting a single 200Gb LUN which is mapped to both hosts
Techhead has a good step-by-step how to setup an OpenFiler here that you should check out if you want to know how to setup the volumes etc.
I made sure I set the target name in Openfiler to match the LUN and filer name so it’s not too confusing in the iSCSI setup – as shown below;
if it helps my target naming convention was vm-filer-X-lun-X which means I can have multiple filers, presenting multiple targets with a sensible naming convention – the target name is only visible within iSCSI communications but does need to be unique if you will be integrating with real-world stuff.

Storage Adapters view from an ESX host – it doesn’t know the iSCSI target is a VM that it is running 🙂

Because I have a non routed L3 network my storage is all hidden in the 103 VLAN, to administer my OpenFiler I have to use a browser in a VM connected to the storage VLAN, I did play around with multi-homing my OpenFilers but didn’t have much success getting iSCSI to play nicely, it’s not too much of a pain to do it this way and I’m sure my storage is isolated to a specific VLAN.
The 3.5 cluster will run my general VMs like Windows domain controllers, file servers and my SSL VPN, they will vMotion between the nodes perfectly. HA won’t really work as the back-end storage for the VM’s live inside an OpenFiler, which is a VM – but it suits my needs and storage vMotion makes online maintenance possible with some advanced planning.
Performance from VM’d OpenFilers has been pretty good and I’m planning to run as many as possible of my VMs on iSCSI – the vSphere cluster running on the ML110’s will likley use the OpenFilers as their SAN storage.
This is the CPU chart from one of the D530 nodes in the last 32hrs whilst I’ve been doing some serious storage vMotion between the OpenFiler VM’s it hosts.


That’s it for now, I’m going to build out the vSphere side of the lab shortly on the ML110’s and will post what I can (subject to NDA, although GA looks to be close)
Make Your own Offline Windows Update CD/DVD
Posted by on February 12, 2008
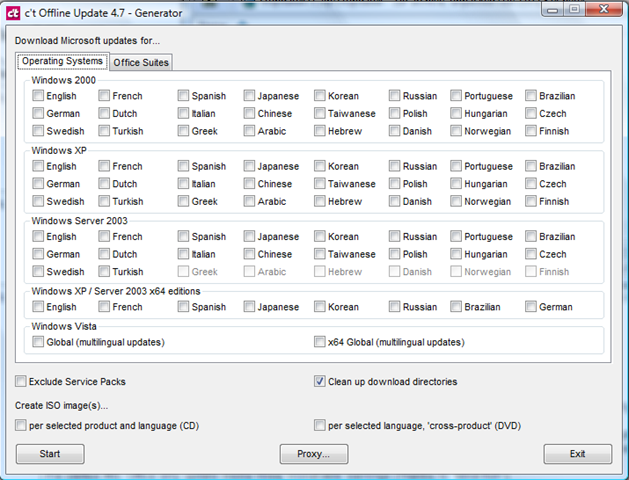
What a handy tool; if you download the app you can select which Microsoft OS/Applications you need patches for and it will download them all via the Windows online catalog to a source directory and then compile a script to auto install them all – it will even generate a .ISO file and handle dependencies and reboots – v.handy (and more efficient) if you need to quickly present it to a bunch of virtual machines with no Internet access or are on a site with slow internet access.
Excellent; now as far as I know Microsoft have no mechanism for doing this other than downloading all the patches manually… even with the Vista RTM images I built last week it had nearly 100Mb of OS patches alone!
Screenshot of the available options in the app – download it here here (updated 14th Sept’09)
OS Updates – multi-language too
Office Suite Updates too
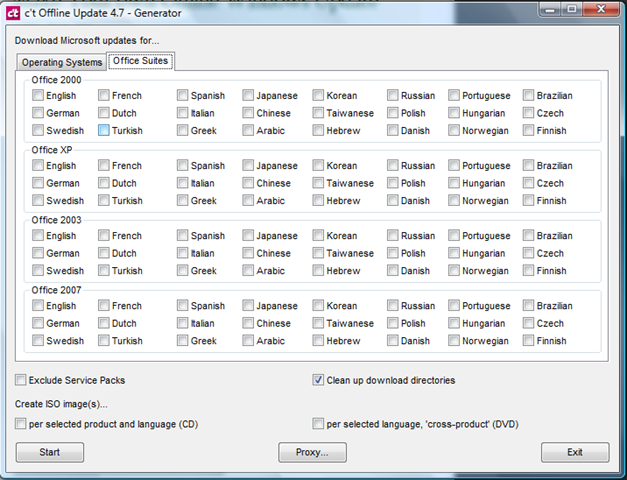
You can even get all the patches for everything and it will compile it into a DVD .ISO image – I’ll definitely be using this – hopefully you can use the info it downloads to slipstream update a vista .WIM image – will have to try that in a couple of weeks.
(original link from a post on slashdot)
Performance Update on Cheap ESX PC
Posted by on February 10, 2008
I’ve not done anything with my home ESX server this week as I’ve been busy with work; so this will be interesting – it’s been powered up all the time with all the VM’s spinning; but not doing very much.
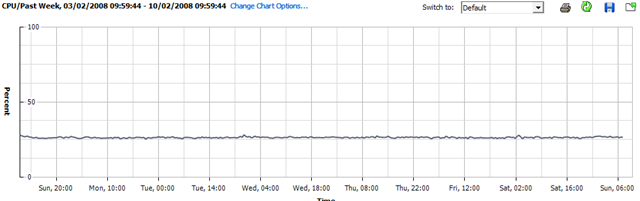
CPU Utilisation
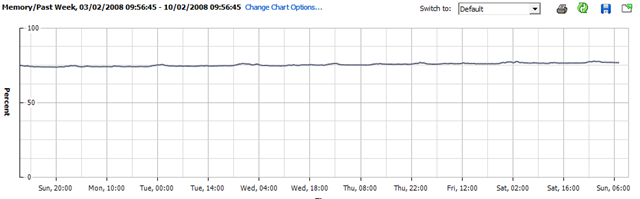
Memory Utilisation
Disk Utilisation
Whist running this set of VMs.. (the CPU stats for VMEX01 and VMEX02 are a bit skewed as I added this bit after the original post and they are both running seti@home (hence increased CPU)
So, nothing interesting to see here – but might be worth bearing in mind for some kind of sizing estimate; this is a single core CPU (HT enabled) PC with 4Gb RAM and a single 500Gb SATA disk
Hopefully I will get some time this week to load up SETI@Home or Folding@Home and see what that does 🙂 it should be a good test to see how well the hypervisor manages CPU timesharing between hosts.
Split Screen Browsing with Firefox
Posted by on February 7, 2008
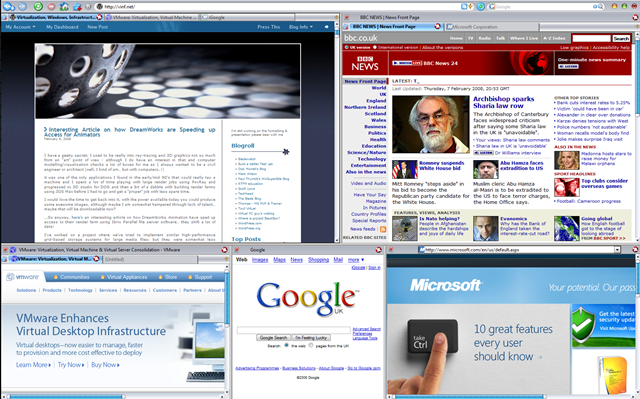
My home office setup has a 20″ widescreen Dell TFT which I use with my laptop an elevated docking station – my laptop has a rather low screen resolution as it’s quite small so this is a great dual monitor setup. The widescreen is handy for keeping a web browser open for referring to online documentation or and working on documents or large Visio diagrams.
The only gripe is that a lot of web pages (like the BBC) waste a lot of the widescreen real-estate as they format (or don’t re-format) for different screen resolutions.
The Split Browser Plugin for Firefox (my favourite browser) that allows you to essentially have multiple browser sessions and sub-tabs in one full-screen Window.
it has load of options – if the screen layout gets a bit confusing you can bring all the split pages back to one window with multiple tabs and vice-versa.
Screenshot
The (also useful) IETab plug in means some of those sub-pages can also be rendered using IE – but all within Firefox.
Firefox has such a good community of developers and I have always been able to find a plug-in that does exactly the odd-feature I “need”.
Brilliant.
Problems Restoring a non-SysPrep Vista Image Using DiskPart & ImageX
Posted by on February 3, 2008
Goal: keep a single .WIM file, Multiple instances of the same build in the .WIM file
Build001 non-sysprep’d version for maintenence with all latest patches and corp apps
Build002 sysprep but no domain for home workers/3rd party
Build003 sysprep + domain joining and scripted OOBE for corp machines
Build004…etc. tweaks to the sysprep – for different domains/customers or OOBE settings like language etc.
Build a bootable WinPE DVD with ImageX and the large .WIM file stored on it so no network connectivity required to install (at this stage) just a single DVD.
Reboot from Win PE to start Vista MiniSetup/OOBE
I hit a problem as when I restored build001 to my reference machine it wouldn’t boot and immediatley gave a 0xc000000e error
This was because my automated build DVD runs diskpart with a scripted set of commands (WIPEDISK.TXT) which includes the clean command
WIPEDISK.TXT
select disk 0
clean
create partition primary
select partition 1
active
format fs=ntfs quick
assign letter=c
exit
This caused problems in this instance because The clean command erases the partition table ID.
If an image has not been-sysprep’d it still looks for the original partition table ID (which diskpart removed) hence the stop error at boot.
Sysprep’d images don’t have this problem as the “/generalize” switch resets this dependency on the partition table entries and mini-setup runs at 1st boot to fix it up.
So, if you need to do maintenance on a non-sysprep’d reference image then
- You need to restore it via imageX and your usual process (in my case a bootable PE DVD)
- It won’t be able to boot – it will give an 0xc000000e error
- Boot the reference machine from your original Vista install DVD and choose to repair
- This puts back the partition table ID and it will boot again
- Once it’s booted you can carry out any online maintenance, add extra software etc. to customise it
- Then sysprep /generalize /oobe /shutdown your reference machine
- Map a drive to your master .WIM file, or a USB disk etc.
- Append the changes to the master .wim file (remembering to use the /APPEND switch; if you just use /CAPTURE you will OVERWRITE your .wim file and be very sad.. Did it twice before I learnt to backup the .WIM file before hand!
- Then re-master your DVD – with the appropriate files – I just inject the .WIM file to the Windows PE DVD I made using PowerISO.
Rinse and repeat.
Thanks to this post http://forums.microsoft.com/TechNet/ShowPost.aspx?PostID=1099145&SiteID=17 and this post http://www.svrops.com/svrops/articles/winvistape2.htmI figured it out…eventually!
Making Something Run When a Windows PE 2.0 CD/DVD Starts.
Posted by on February 3, 2008
I need a DVD that automatically applies a .WIM image when WinPE boots – no prompts; just want to press F9 for the BIOS Boot menu and walk away until build is finished.
I built a WinPE 2.0 image the usual way, but I want to add files to it (easy with PowerISO) but I want it to do something when it starts up..
To do this I had to customise the BOOT.WIM file which you use to generate your WinPE ISO file, note you need to edit BOOT.WIM not the WinPE.WIM file.
I used the /MOUNTRW switch for imageX (more details here) to mount the BOOT.WIM file – if you look in it’s WINDOWS\SYSTEM32 directory there is a file called STARTNET.CMD – this is mostly the same as a batch file so you can put whatever commands you want in here, in my case I edited it as follows;
wpeinit
CALL D:\tools\buildPC.bat
wpeutil reboot
Once the changes are made you can save the changes back using the /UNMOUNT and /COMMIT switches – you’ll then need to rebuild the Windows PE .ISO using OSCDIMG.EXE.
You can then inject files into the .ISO file you’ve generated – you could put them in the BOOT.WIM as above but its quicker and easier to do this via PowerISO (or similar tool) if you are going to need to make changes, rather than recompiling the BOOT.WIM and .ISO files.
This is the BUILDPC.BAT batch file that STARTNET.CMD calls, it prepares the disk and deploys the image file to the local HDD.
@echo off
diskpart /s d:\sources\wipedisk.txt
d:
cd\tools
Echo applying image
imagex.exe /apply d:\sources\MasterImageFile.wim 1 C:
Echo Image Downloaded, rebooting.
Save the file and burn.. job done.
It’s a good idea to use a virtual machine to test the .ISO file out – and is cheaper than wasting lots of DVD/CD-R’s while you are fine-tuning!
Performance on a cheap ESX PC
Posted by on February 1, 2008
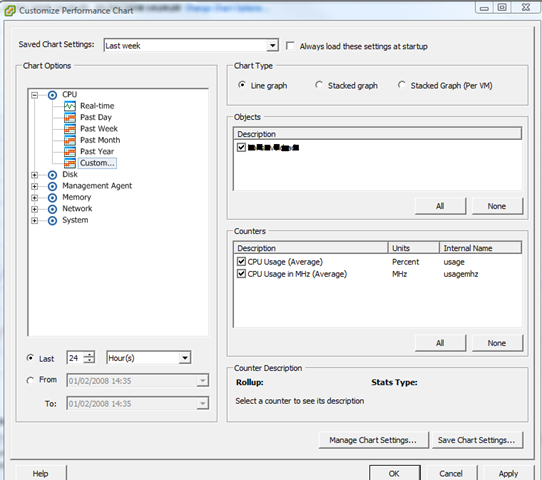
I thought I’d post some performance graphs from my cheap HP D530 ESX server using the Virtual Centre console (which incidentally, is good for getting this info quickly and simply).
Screenshot of the UI for querying performance stats.
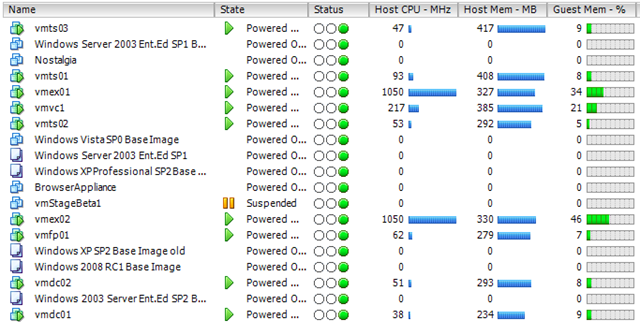
View of currently running VMs – a mix of Windows 2003/2008 VMs
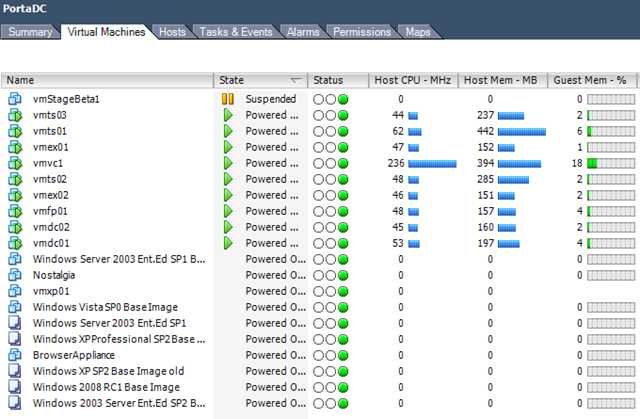
Current Overall ESX Host statistics (with a clone from template going on)
![]()
As I noted elsewhere on my blog it has 4Gb RAM and a single 2.8GHz HT CPU – and with this VM load it gives an average CPU load of 25-30%. Almost all of these VM’s are idling but all respond in good time to network access/TS etc- not bad at all for a desktop PC!
CPU usage for the last 24 hours
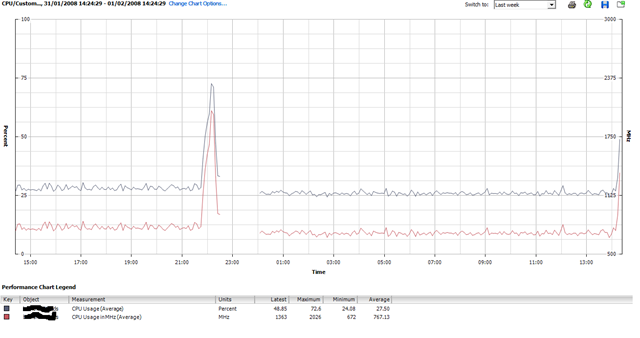
The big spike around 22:00 was when I cloned up a whole load more VM’s – seems to have upset the stats so need to try and have a look at that..
It’s also interesting to note that I added 4 Windows 2003 VM’s last night but that hasn’t actually increased the overall CPU average – ESX must be quite efficient at time-slicing all those idle VMs.
I had 3-4 “deploy from template..” operations going on at the same time and it really bogged down the performance of the VM’s (usable, but only just..) but it is just a single SATA disk drive so I can live with that.
Deploying 1 VM at a time had little or no impact – slight CPU spike to ~50% as you’ll see to the far right of the chart as I kicked off another one just now.
When i get time I’m going to drop some jobs into the VM’s that will tax the virtual CPUs a bit more and compare results – maybe some Folding@Home activity Mmmmm that would definitley tax it.
Update on the Cheap ESX Home Server
Posted by on January 31, 2008
All running well, we had a power cut the other day but the PC didn’t automatically power back on when power was restored; I wonder if there is a BIOS setting for that – PC’s always used to have something along those lines.
Bit of manual intervention to switch it on and it was back and running.. no ill effects and all the VM’s started up normally.
I’m hammering it a bit now and have some Windows Server 2008 RC1 templates setup as I need to try out the new Terminal Services functionality so I’m hoping to build a small 2008 TS farm under ESX – no customization wizard available yet for 2008 😦
Maybe will see how Windows built in NLB works under ESX Mmmm.
So, will see what performance is like when I have a lot more going on..

