Virtualization, Cloud, Infrastructure and all that stuff in-between
My ramblings on the stuff that holds it all together
Category Archives: Performance
Comparing the I/O Performance of 2 or more Virtual Machines SSD, SATA & IOmeter
Posted by on November 19, 2009
I’m currently doing some work on SSD storage and virtual machines so I need an easy way of comparing I/O performance between a couple of virtual machines, each backed onto different types of storage.
I normally use IOmeter for this kind of work but generally only in a standalone manner – i.e I can run IOmeter inside a single VM guest and get statistics on the console etc.
With a bit of a read of the manual I quickly realised IOmeter was capable of so much more! (amazing things, manuals :)).
Note: You should download IOmeter from this link at SourceForge and not this link to iometer.org; which seems to be an older non-maintained build
You can run a central console which runs the IOmeter Windows GUI application then add any number of “managers” – which are machines doing the actual benchmarking activities (disk thrashing etc.)

The use of the term manager is a bit confusing to me as you would think the “manager” is the machine running the IOmeter console, but actually each VM or physical server you want to load-test is a known as a manager, which in turn runs a number of workers which carry out the I/O tasks you specify and reports the results back to a central console (the IOmeter GUI application shown above).
Each VM that you want to test runs the dynamo.exe command with some switches to point it at an appropriate IOmeter console to report results.
For reference:
On the logging machine run IOmeter.exe
on each VM (or indeed physical machine) that you want to benchmark at the same time run the dynamo.exe command with the following switches
dynamo.exe /i <IP of machine running IOmeter.exe> /n <display name of this machine – can be anything> /m <IP address or hostname of this machine>
in my case;
dynamo.exe /i 192.168.66.11 /n SATA-VM /m 192.168.66.153
You will then see output similar to the following;

The IOmeter console will now show all the managers you have logged on – in my case I have one VM backed to a SATA disk and one VM backed to an SSD disk.

I can now assign some disk targets and access specifications to each worker and hit start to make it “do stuff which I can measure” 🙂 for more info on how to do this see the rather comprehensive IOmeter manual
If you want to watch in realtime, click the results display tab and move the update frequency slider to as few seconds as possible

If you want to compare figures from multiple managers (VMs) against each other you can just drag and drop them on to the results tab

Then chose the metric you want to compare from the boxes – which don’t look like normal drop down elements so you probably didn’t notice them.

You can now compare the throughput of both machines in real-time next to each other – in this instance the SSD backed VM achieves less throughput than the SATA drive backed VM (more on this consumer-grade SSD in a later post)

Depending on the options you chose when starting the test run the results may have been logged out to a CSV file for later analysis.
Hope that helps get you going – if you want to use this approach to benchmark your storage array with a standard set of representative IOmeter loads – see these VMware communities threads
http://communities.vmware.com/thread/197844
http://communities.vmware.com/thread/73745
from a quick scan of the thread, this file seems to be the baseline everyone is measuring against
http://www.mez.co.uk/OpenPerformanceTest.icf
To use the above file you need to open it with IOmeter, then start up your VMs that you want to benchmark as described earlier in this post.
You will need to manually assign the disk target to each worker once you have opened that .icf file in IOmeter unless you set them in the .icf file manually.

This is the test whilst running with the display adjusted to show interesting figures – note the standard test contains a number of different iterations and access profiles – this is just showing averages since the start of the test and are not final figures.


This screenshot shows the final results of the run, and the verdict is; overall consumer-grade SSD sucks when compared against a single 7.2k RPM 1Tb SATA drive plugged into an OpenFiler 🙂 I still have some analysis to do on that one – and it’s not quite that simple as there are a number of different tests run as part of the sequence some of which are better suited to SSD’s

More posts on this to follow on SSD & SATA performance for your lab in the coming weeks, stay tuned..
iSCSI LUN is very slow/no longer visible from vSphere host
Posted by on October 29, 2009
I encountered this situation in my home lab recently – to be honest I’m not exactly sure of the cause yet, but I think it was because of some excessive I/O from the large number of virtualized vSphere hosts and FT instances I have been using mixed with some scheduled storage vMotion – over the weekend all of my virtual machines seem to have died and crashed or become unresponsive.
Firstly, to be clear this is a lab setup; using a cheap/home PC type SATA disk and equipment not your typical production cluster so it’s already working pretty hard (and doing quite well, most of the time too)
The hosts could ping the Openfiler via he vmkernel interface using vmkping so I knew there wasn’t an IP/VLAN problem but access to the LUNs was very slow, or intermittent – directory listings would be very slow, time out and eventually became non-responsive.
I couldn’t power off or restart VMs via the VI client, and starting them was very slow/unresponsive and eventually failed, I tried rebooting the vSphere 4 hosts, as well as the OpenFiler PC that runs the storage but that didn’t resolve the problem either.
At some point during this troubleshooting the 1TB iSCSI LUN I store my VMs on disappeared totally from the vSphere hosts and no amount of rescanning HBA’s would bring it back.
The Path/LUN was visible down the iSCSI HBA but from the storage tab of the VI client
Visible down the iSCSI path..

But the VMFS volume it contains is missing from the list of data stores

This is a command line representation of the same thing from the /vmfs/devices/disks directory.

OpenFiler and it’s LVM tools didn’t seem to report any disk/iSCSI problems and my thoughts turned to some kind of logical VMFS corruption, which reminded me of that long standing but never completed task to install some kind of VMFS backup utility!
At this point I powered down all of the ESX hosts, except one to eliminate any complications and set about researching VMFS repair/recovery tools.
I checked the VMKernel log file (/var/log/vmkernel) and found the following
[root@ml110-2 /]# tail /var/log/vmkernel
Oct 26 17:31:56 ml110-2 vmkernel: 0:00:06:48.323 cpu0:4096)VMNIX: VmkDev: 2249: Added SCSI device vml0:3:0 (t10.F405E46494C454009653D4361323D294E41744D217146765)
Oct 26 17:31:57 ml110-2 vmkernel: 0:00:06:49.244 cpu1:4097)NMP: nmp_CompleteCommandForPath: Command 0x12 (0x410004168500) to NMP device "mpx.vmhba0:C0:T0:L0" failed on physical path "vmhba0:C0:T0:L0" H:0x0 D:0x2 P:0x0 Valid sense data: 0x5 0x24 0x0.
Oct 26 17:31:57 ml110-2 vmkernel: 0:00:06:49.244 cpu1:4097)ScsiDeviceIO: 747: Command 0x12 to device "mpx.vmhba0:C0:T0:L0" failed H:0x0 D:0x2 P:0x0 Valid sense data: 0x5 0x24 0x0.
Oct 26 17:32:00 ml110-2 vmkernel: 0:00:06:51.750 cpu0:4103)ScsiCore: 1179: Sync CR at 64
Oct 26 17:32:01 ml110-2 vmkernel: 0:00:06:52.702 cpu0:4103)ScsiCore: 1179: Sync CR at 48
Oct 26 17:32:02 ml110-2 vmkernel: 0:00:06:53.702 cpu0:4103)ScsiCore: 1179: Sync CR at 32
Oct 26 17:32:03 ml110-2 vmkernel: 0:00:06:54.690 cpu0:4103)ScsiCore: 1179: Sync CR at 16
Oct 26 17:32:04 ml110-2 vmkernel: 0:00:06:55.700 cpu0:4103)WARNING: ScsiDeviceIO: 1374: I/O failed due to too many reservation conflicts. t10.F405E46494C454009653D4361323D294E41744D217146765 (920 0 3)
Oct 26 17:32:04 ml110-2 vmkernel: 0:00:06:55.700 cpu0:4103)ScsiDeviceIO: 2348: Could not execute READ CAPACITY for Device "t10.F405E46494C454009653D4361323D294E41744D217146765" from Plugin "NMP" due to SCSI reservation. Using default values.
Oct 26 17:32:04 ml110-2 vmkernel: 0:00:06:55.881 cpu1:4103)FSS: 3647: No FS driver claimed device ‘4a531c32-1d468864-4515-0019bbcbc9ac’: Not supported
Due to too many SCSI reservation conflicts, so hopefully it wasn’t looking like corruption but a locked-out disk – a quick Google turned up this KB article – which reminded me that SATA disks can only do so much 🙂
Multiple reboots of hosts and the OpenFiler hadn’t cleared this situation – so I had to use vmkfstools to reset the locks and get my LUN back, these are the steps I took..
You need to find the disk ID to pass to the vmkfstools –L targetreset command, to do this from the command line look under /vmfs/devices/disks (top screenshot below)
You should be able to identify which one you want by matching up the disk identifier.

Then pass this identifier to the vmkfstools command as follows (your own disk identifier will be different) – hint: use cut & paste or tab-completion to put the disk identifier in.
vmkfstools-L targetreset /vmfs/devices/disks/t10.F405E46494C4540096(…)
You will then need to rescan the relevant HBA using the esxcfg-rescan command (in this instance the LUN is presented down the iSCSI HBA – which is vmhba34 in vSphere)
esxcfg-rescan vmhba34
(you can also do this part via the vSphere client)
if you now look under /vmfs/volumes the VMFS volume should be back online, or do a refresh in the vSphere client storage pane.
All was now resolved and virtual machines started to change from (inaccessible) in the VM inventory back to the correct VM names.
One other complication was that my DC, DNS, SQL and vCenter server are all VMs on this platform and residing on that same LUN. So you can imagine the havoc that causes when none of them can run because the storage has disappeared; in this case it’s worth remembering that you can point the vSphere client directly at an ESX node, not just vCenter and start/stop VMs from there – to do this just put the hostname or IP address when you logon rather than the vCenter address (and remember the root password for your boxes!) – if you had DRS enabled it does mean you’ll have to go hunting for where the VM was running when it died.

In conclusion I guess there was gradual degradation of access as all the hosts fought with a single SATA disk and increased I/O traffic until the point all my troubleshooting/restarting of VMs overwhelmed what it could do. I might need to reconsider how many VMs I run from a single SATA disk as I’m probably pushing it too far – remember kids this is a lab/home setup; not production, so I can get away with it 🙂
In my case it was an inconvenience that it took the volume offline and prevented further access, I can only assume this mechanism is in-place to prevent disk activity being dropped/lost which would result in corruption of the VMFS or individual VMs.
With the mention of I/O DRS in upcoming versions of vSphere that could be an interesting way of pre-emotively avoiding this situation if it does automated storage vMotion to less busy LUNs rather than just vMotion between hosts on the basis of IOPs.
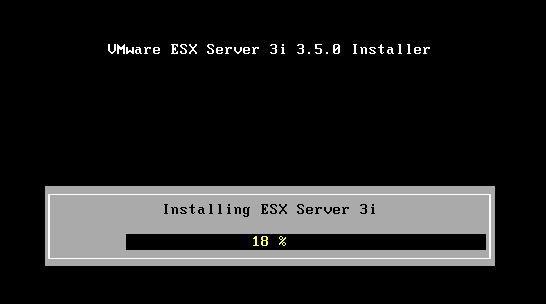
Running ESX 3.5 and 3i Under VMWare Workstation 6.5 Beta Build 91182
Posted by on May 18, 2008
Following on from my earlier post I upgraded my installation to the new build of 6.5. it un-installed the old build and re-installed the latest without a problem, took about 30mins and required a reboot of the host OS.
All my previously suspended XP/2003 VM’s resumed ok without a restart but needed an upgrade to the VMTools which did require a restart of the guest OS – all completed with no problems.
Now, onto installing ESX….
I used the settings from Eric’s post here to edit my .vmx file
ethernet0.virtualDev = “e1000”
monitor.virtual_exec = “hardware”
monitor_control.restrict_backdoor = “true”
Note – you need to select an x64 Linux version from the VM type drop down, if you have to go back and change it via the GUI after you’ve edited the .vmx file it overwrites the Ethernet card “e1000” setting to “vlance” so you need to edit again otherwise the ESX installer won’t find a compatible NIC and won’t install.
it was initially very slow to boot; 5mins on my dual core laptop with only one error – which was expected..


To improve the performance I changed my installation to run the non-debug version of the Workstation binaries (rename the vmware-vmx.exe to vmware-vmx-debug.exe)
note: this isn’t recommended unless you know what you are doing, VMWare will rely on the output from the debug version of the code if you need to report any issues)
It also seems to work for the installable version of ESX 3i… (although I’ve not quite figured out the point of that version yet :)).

Install prompt

it did fail with an error the 1st time round..

this was because I had specified an IDE disk as per the ESX instructions, I changed it to a SCSI one and it worked ok.
Finished..
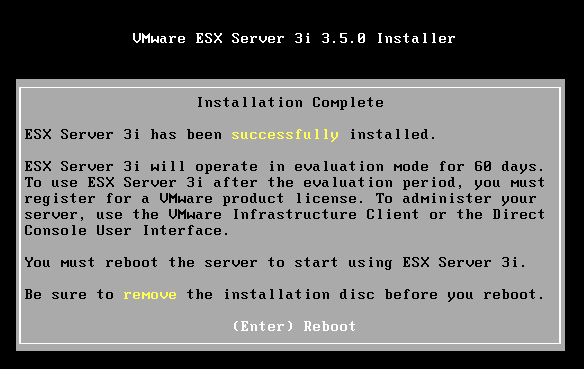

The ESX 3i install has a footprint of about 200Mb on disk, and ESX 3.5 uses 1.5Gb.
I’m going to keep the 3.5 install on my laptop and will try to use linked clones to maintain a couple of different versions/configs to save disk space.. I’m sure I could knock up a quick script to change the hostname/IP of each clone – if I do I’ll post it here.
Why would you want to do this? well because you can, of course 🙂 and its handy for testing patch updates and scripts for ESX management etc.
I will also try to get a ESX DRS cluster running under workstation with a couple of ESX hosts and shared storage over iSCSI using something like OpenFiler as shown here. won’t exactly be production performance, but useful for testing and demo’ing.
VMWare Server Performance – A Practical Example
Posted by on April 19, 2008
The following screen dump is from an HP DL380G5 server that runs all the core infrastructure under VMWare Server (the free one) for a friend’s company which I admin sometimes.
It is housed in some co-lo space and runs the average range of Windows servers used by a small but global business, Exchange SQL, Windows 2003 Terminal Services.
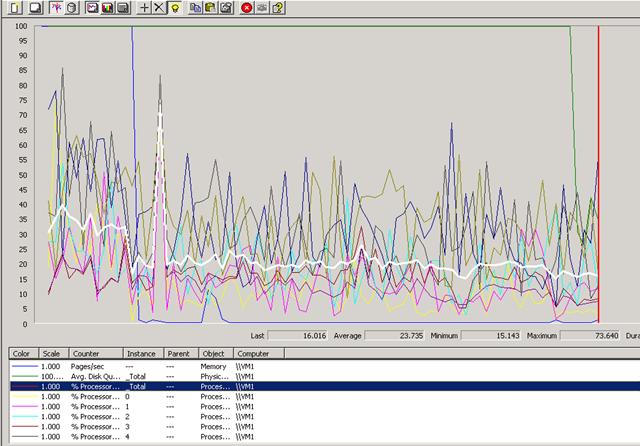
As a result of some planned (but not very well communicated!) power maintenance the whole building lost power earlier today, when it was restored I grabbed the following screenshot as the 15 or so Virtual Machines automatically booted.
interesting to note that all the VM’s had been configured to auto-start with the guest OS, meaning there wasn’t any manual intervention required, even though it was a totally dirty shutdown for both the host and guest OS’es (No UPS, as the building and suite is supposed to have redundant power feeds to each rack – in this instance the planned maintenance was on the building wiring so required taking down all power feeds for a 5 yearly inspection..)
There are no startup delay settings in the free version of VMWare Server so they all start at the same time, interesting to note the following points..
The blue line that makes a rapid drop is the pages/second counter, and the 2nd big drop (green) is the disk queue length. the hilighted (white) line is the overall %CPU time, note the sample frequency was 15 seconds on this perfmon.
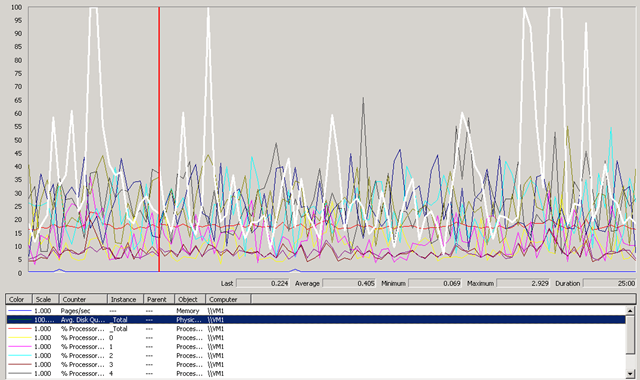
After it had settled down, I took the following screenshot, it hardly breaks a sweat during its working day. there are usually 10-15 concurrent users on this system from around the world (access provisioned via an SSL VPN device) and a pretty heavily used Exchange mail system.
The box is an HP DL380 G5 with 2 x quad core CPUs (8 cores in total) and 16Gb of RAM, it has 8 x 146Gb 15k HDDs in a single RAID 5 set + hot-spare, it was purchased in early 2007 and cost c.£8,000 (UK Prices)
It runs Windows 2003 Enterprise Edition x64 edition with VMWare Server 1.0.2 (yes, its an old build.. but if it ain’t broke..) and they have purchased multiple w2k3 ent-edition licences to take advantage of the virtualisation use-rights to cover the installed virtual OS’es.
It’s been in-place for a year and hardly ever has to be touched, its rock-solidly available and the company have noticed several marked improvements since they P2V’d their old servers onto this platform, as follows;
- No hardware failures – moving from lots of low-end servers (Dell) and desktops to a single box (10:1 consolidation)
- The DL380 has good redundancy built in, but it’s also backed up with a h/w maintenence contract, and they also have a spare cold-standby server to resume service from backups if data is lost.
- Less noise, the old servers were dotted around their old offices in corners, racks etc – this is the main thing they liked!
- Simple access anywhere – using a Juniper SA2000 SSL VPN, its easy to get secure access from anywhere
- Less reliance on physical offices and cheap DSL-grade data communications, now the servers are hosted on the end of a reliable, data centre class network link with an SLA to back it up. if an individual office looses its ADSL connection, no real issue – people pick up their laptop(s) and work from home/starbucks etc.
- Good comms are cheaper in data centres than in your branch offices (usually)
Hopefully this goes to show the free version of VMWare’s server products can work almost as well if budget is a big concern, ESX would definitely give some better features and make backup easier, they are considering upgrading and combining with something like Veeam Backup to handle failover/backup.
Performance Expectations on a Shared Virtual Platform
Posted by on March 12, 2008
Some interesting discussion linked-to within this article on Storagezilla. people using Amazon’s EC2 platform are complaining because they feel they are getting less performance than they should.
Always an interesting point to bear in mind and useful in expectation setting for developers. You may want a dedicated CPU/core – but do you really need all of that CPU all of the time? in most cases I would guess not; and if you do need that level of performance – shouldn’t you be considering a physical platform rather than a virtual one?

