Virtualization, Cloud, Infrastructure and all that stuff in-between
My ramblings on the stuff that holds it all together
Platespin PowerConvert Part 3: V2P
Posted by on December 1, 2008
Following on from the 2nd part of this series, I’ll now show how we can take the AD/Exchange virtual machine that we have created from a physical server via P2V and convert it back to a different physical machine (V2P) using PlateSpin PowerConvert.
The original source machine was a Dell Inspiron 510m laptop, and the target machine we will be using in this instance is a Dell Latitude D510; this wouldn’t typically work if we were to use a normal disk imaging approach as products like Ghost etc. can’t inject the correct boot time and drivers to make it work.
PowerConvert, however can which is very clever IMHO.
Note, for this part I will use the following convention:
Source Machine – virtual machine running on ESX (previously P2V’d from a physical machine)
Target machine – Dell Latitude D510 laptop
The following diagram shows my lab setup;

More specific details on the TCP/IP ports used by PlateSpin PowerConvert can be found here.
Because of where I am trying this I don’t have a wired connection back to my ESX box – so I am using the bridge connections feature of Vista on my laptop to provide the networking for the target machine – this is just a peculiarity of where my study is as I’ve not got round to getting a wired GigE connection here from my ESX rack.
To begin with we need to boot the target machine from a WinPE CD that PlateSpin PowerConvert prepares, these are downloadable from Platespin.com; In this instance I’m using the following downloaded .ISO file.
PlateSpin PowerConvert 7.0 Physical Target Take Control ISO For Low Memory Servers – [WINPE.ISO]
Use this ISO image for servers with low memory, between 256 MB and 384 MB.Currently, target physical servers must have at least 256 MB of RAM
The target machine only has 256Mb of RAM, so it won’t break any records for performance with Exchange & AD running and will need to use the low-memory version of the boot CD.
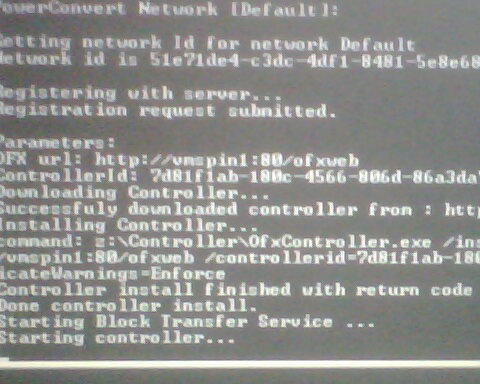
You boot the target machine from the CD, you are prompted to enter the URL to the powerconvert server which is in the format http://<servername>/powerconvert
And then some server credentials and IP address details, it will then contact the PowerConvert server and register itself (apologies for poor quality pic – cameraphone!)
Once it’s registered itself with the PowerConvert server it will show up in the servers view as below.
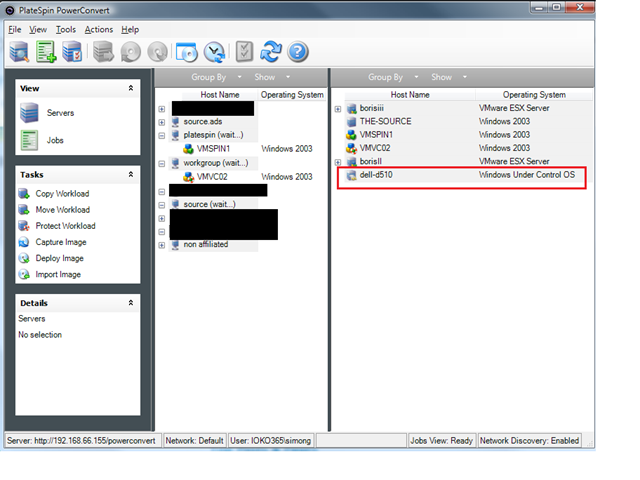
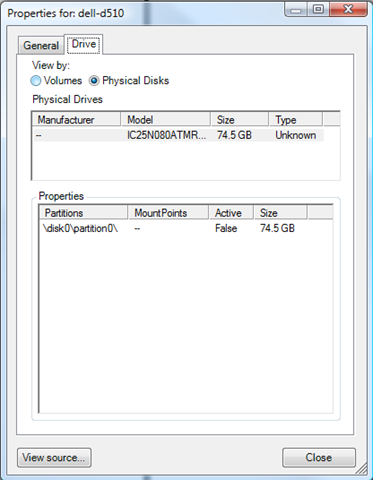
You can look at its properties as it’s been “discovered” as part of this process.

In this instance we want to move the installation from the source to the target – for example if we found performance under a VM was not satisfactory or had a software problem that the vendor will only support if it can be reproduced on physical hardware, this gives us the job setup displayed below (essentially the reverse of part 2 in this series – P2V).
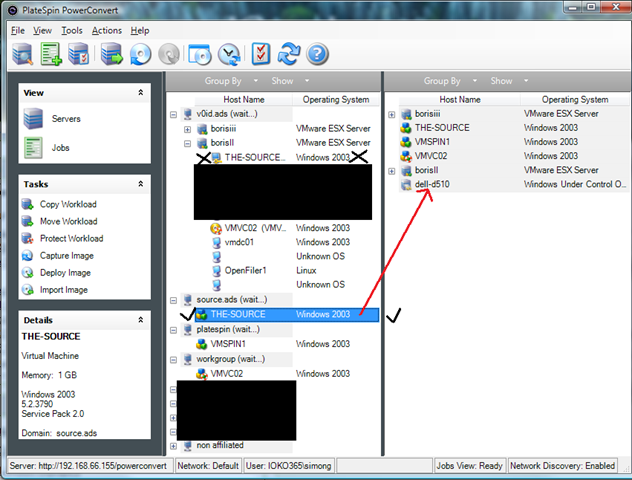
Make sure you choose the discovered source OS (hint: refresh it if it’s still in the DB as a physical machine), rather than the VM under the ESX tree
The target machine can now have source machines (left hand pane) dragged and dropped onto it to start a new conversion job.
Clicking “Advanced” brings up the following screen, any red X means a setting needs to be changed before you can proceed.

Note – we want to do an online snapshot based transfer to minimise downtime and support moving the AD/Exchange installation as-is and shutdown the source machine (otherwise we will have IP address and name conflicts) when the target machine boots.

Ok, so here we go, nothing up this sleeve, nothing up this sleeve 🙂 Job submitted & running;
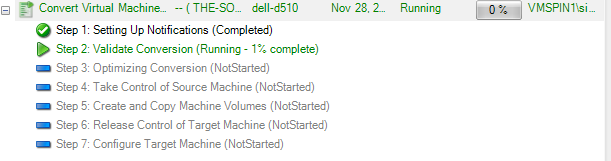
At this point I walked away and had some lunch 🙂 an hour later it was finished and the Dell laptop was running the Windows 2003 DC and Exchange server, all intact and totally hands-off – very impressive, this is the breakdown of job steps shown in the final report.

Once I’d logged on there were a few new hardware found dialogs for things like the on-board modem and video card as I’d not uploaded the drivers beforehand to let Platespin take care of it.
NIC IP settings, everything were applied to the new NIC and the laptop is now running the OS and app “workload” that was previously a virtual machine.

Very impressive – I’ve got some other spare hardware in the lab so I’m also going to try V2P to some even more different hardware – I have a quad CPU ML570g1 – so if I can get that going again (its been switched off since I migrated my VM labs to D530’s) I’ll give that a go too just to really push it; as I realise the source and target machines were sort of similar Dell models in this instance.
![]()
All in this conversion took less than an hour and considering the network transfer was bridging over a 54g wireless connection and the source VM was just running on a cheap D530 ESX box I think that’s pretty good going!
Next up we will take a look at Workload Protection, which leverages the X2X functionality we’ve seen so far to keep a sync’d up clone of a production server (VM or physical) to a virtual machine for disaster recovery.


Nice post. Thank you for the info. Keep it up.
Pingback: PlateSpin CPSA: Another feather in the cap.
Hi
I am trying to do V2P migration using PlateSpin PortabilitySuite 8.1.
I am successfully able to register Physical Target Server on which Take Control ISO is running with the PortabilitySuite Server, but the Target Server is not getting visible in the PortabilitySuite Client Server’s tab.
Please help to resolve this.
Thanks
Regards
Arpit