Virtualization, Cloud, Infrastructure and all that stuff in-between
My ramblings on the stuff that holds it all together
Category Archives: Platespin
Platespin PowerConvert Part 3: V2P
Posted by on December 1, 2008
Following on from the 2nd part of this series, I’ll now show how we can take the AD/Exchange virtual machine that we have created from a physical server via P2V and convert it back to a different physical machine (V2P) using PlateSpin PowerConvert.
The original source machine was a Dell Inspiron 510m laptop, and the target machine we will be using in this instance is a Dell Latitude D510; this wouldn’t typically work if we were to use a normal disk imaging approach as products like Ghost etc. can’t inject the correct boot time and drivers to make it work.
PowerConvert, however can which is very clever IMHO.
Note, for this part I will use the following convention:
Source Machine – virtual machine running on ESX (previously P2V’d from a physical machine)
Target machine – Dell Latitude D510 laptop
The following diagram shows my lab setup;

More specific details on the TCP/IP ports used by PlateSpin PowerConvert can be found here.
Because of where I am trying this I don’t have a wired connection back to my ESX box – so I am using the bridge connections feature of Vista on my laptop to provide the networking for the target machine – this is just a peculiarity of where my study is as I’ve not got round to getting a wired GigE connection here from my ESX rack.
To begin with we need to boot the target machine from a WinPE CD that PlateSpin PowerConvert prepares, these are downloadable from Platespin.com; In this instance I’m using the following downloaded .ISO file.
PlateSpin PowerConvert 7.0 Physical Target Take Control ISO For Low Memory Servers – [WINPE.ISO]
Use this ISO image for servers with low memory, between 256 MB and 384 MB.Currently, target physical servers must have at least 256 MB of RAM
The target machine only has 256Mb of RAM, so it won’t break any records for performance with Exchange & AD running and will need to use the low-memory version of the boot CD.
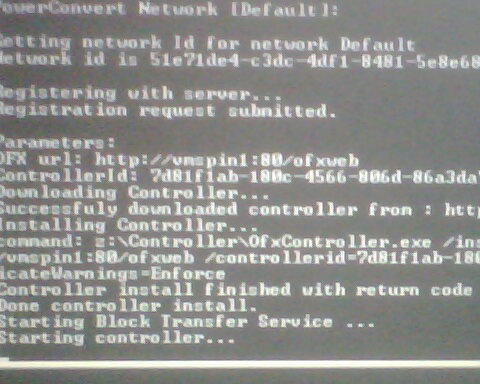
You boot the target machine from the CD, you are prompted to enter the URL to the powerconvert server which is in the format http://<servername>/powerconvert
And then some server credentials and IP address details, it will then contact the PowerConvert server and register itself (apologies for poor quality pic – cameraphone!)
Once it’s registered itself with the PowerConvert server it will show up in the servers view as below.
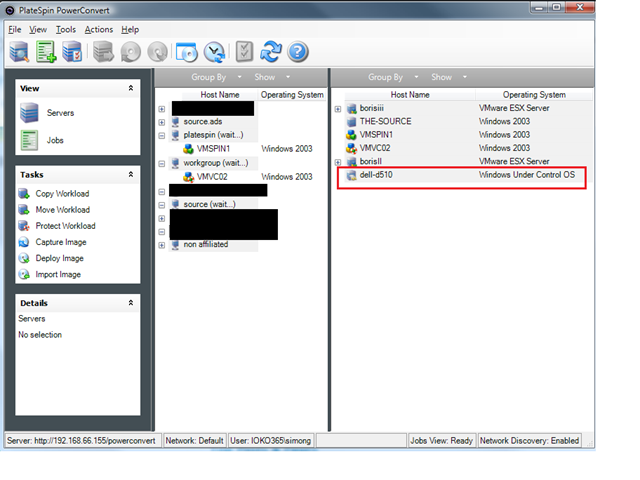
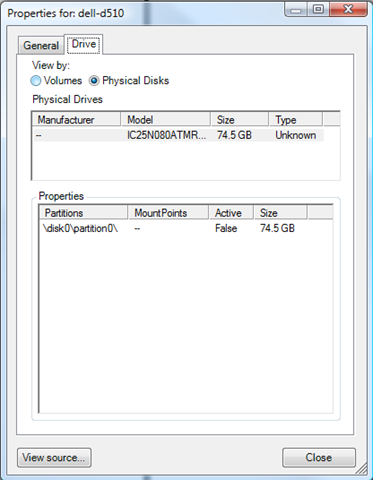
You can look at its properties as it’s been “discovered” as part of this process.

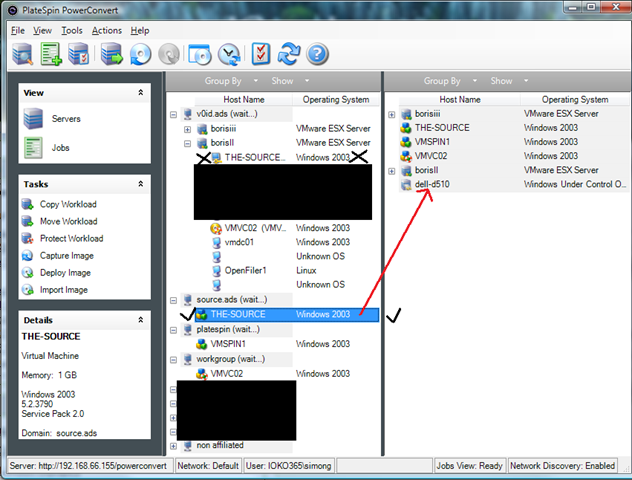
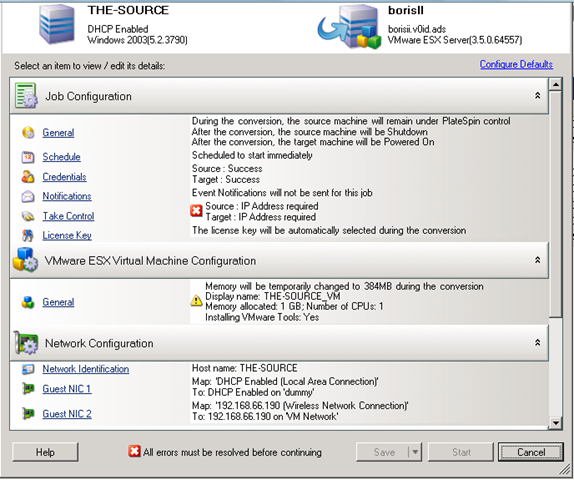
In this instance we want to move the installation from the source to the target – for example if we found performance under a VM was not satisfactory or had a software problem that the vendor will only support if it can be reproduced on physical hardware, this gives us the job setup displayed below (essentially the reverse of part 2 in this series – P2V).
Make sure you choose the discovered source OS (hint: refresh it if it’s still in the DB as a physical machine), rather than the VM under the ESX tree
The target machine can now have source machines (left hand pane) dragged and dropped onto it to start a new conversion job.
Clicking “Advanced” brings up the following screen, any red X means a setting needs to be changed before you can proceed.

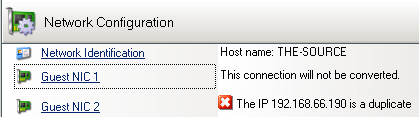
Note – we want to do an online snapshot based transfer to minimise downtime and support moving the AD/Exchange installation as-is and shutdown the source machine (otherwise we will have IP address and name conflicts) when the target machine boots.

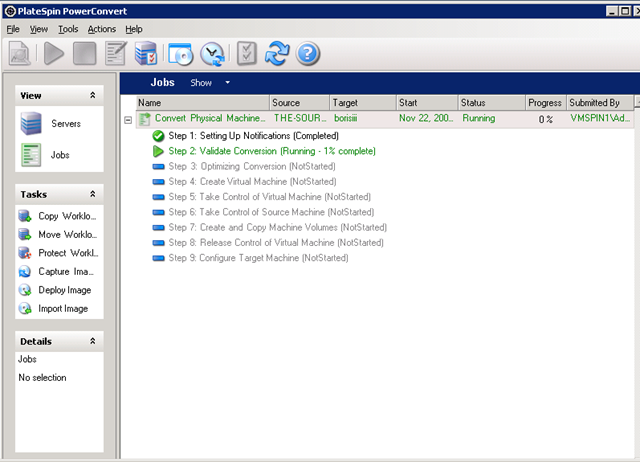
Ok, so here we go, nothing up this sleeve, nothing up this sleeve 🙂 Job submitted & running;
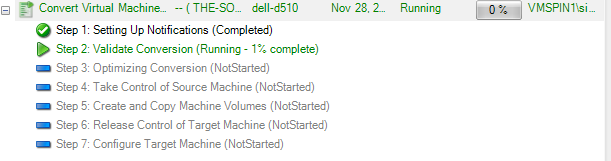
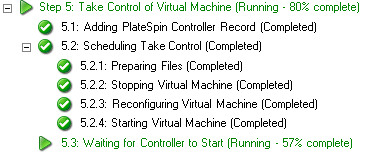
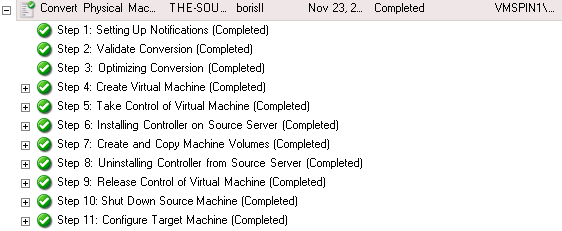
At this point I walked away and had some lunch 🙂 an hour later it was finished and the Dell laptop was running the Windows 2003 DC and Exchange server, all intact and totally hands-off – very impressive, this is the breakdown of job steps shown in the final report.

Once I’d logged on there were a few new hardware found dialogs for things like the on-board modem and video card as I’d not uploaded the drivers beforehand to let Platespin take care of it.
NIC IP settings, everything were applied to the new NIC and the laptop is now running the OS and app “workload” that was previously a virtual machine.

Very impressive – I’ve got some other spare hardware in the lab so I’m also going to try V2P to some even more different hardware – I have a quad CPU ML570g1 – so if I can get that going again (its been switched off since I migrated my VM labs to D530’s) I’ll give that a go too just to really push it; as I realise the source and target machines were sort of similar Dell models in this instance.
![]()
All in this conversion took less than an hour and considering the network transfer was bridging over a 54g wireless connection and the source VM was just running on a cheap D530 ESX box I think that’s pretty good going!
Next up we will take a look at Workload Protection, which leverages the X2X functionality we’ve seen so far to keep a sync’d up clone of a production server (VM or physical) to a virtual machine for disaster recovery.
Platespin PowerConvert Part 2: P2V
Posted by on November 26, 2008
Following on from the previous overview post, My goal here is to do a live P2V of a Windows 2003 Server installation on an old laptop into a virtual machine running on my D530 ESX farm, and just to make things “interesting” the laptop is also running Exchange 2003 🙂
And once this is completed I’ve got a 2nd laptop to which I want to convert the virtual machine onto (V2P).
I’ve implemented PowerConvert in a VM, and all hosts are connected over a gigabit ethernet switch (although the source laptop only has a 10/100 NIC.
I’m aiming to use the live transfer (with snapshot) feature which handles clean-snapshots of all the Exchange and AD databases using Windows Volume Shadow Services (VSS).
The initial screen is below, to get to this stage you need to discover hosts – which can be done via IP address, hostname or network discovery (via listening to broadcasts) – it’s recommended that you discover/refresh each source and target server before doing any migrations – the data is held in an internal MSDE database and is not automatically refreshed.

Select the source and right-click – or you can drag and drop it to the target (i.e physical server booted from a “Take Control” CD or host running a supported (and previously discovered) Hypervisor.

It detects that Exchange is installed on the source
![]()

Advanced view; note red X marks areas that need attention.
Choose which type of transfer
Take Control – “Cold clone” boot source from custom WinPE CD.
Live – File based (file by file copy, suitable for simple servers)
Live – Block Based (faster than file-copy)
Live – Snapshot (uses VSS, supported for applications like Exchange, SQL etc.)
Note the options for what to do with the source machine once the conversion has completed; if you are doing a move like we are you don’t want the source machine left on the network as you will have an IP/name conflict or worse users changing data – so shut it down.

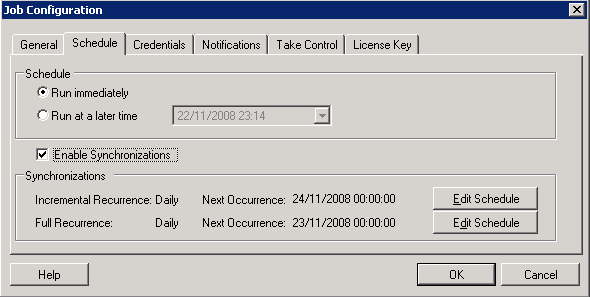
Synchronisation options, handy if you have a lot of data to migrate and want to prep the target some time ahead of a cut-over.
Also used by the workload protection feature (x2V DR) – which is very cool and will be the subject of a future post.
This is an annoying bit where it doesn’t automatically adjust the path to the VM files if you change the virtual machine name – so make sure you edit the path manually as required.

You can choose target resource pool on an ESX server; but as far as I can tell it’s not specifically aware of DRS, virtual centre or different clusters – it’s host only driven.

Moving from single CPU Physical box to dual CPU VM (and vice-versa) is just a check-box.

Note this will replace a file; which is the multiprocessor HAL due to the above option.

An option to sysprep/rename etc. the clone (not used here as we are “moving” i.e decommissioning the source machine)

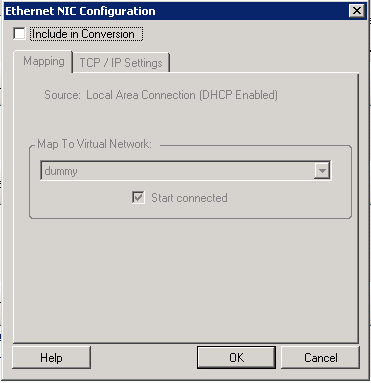
Picked up an unused NIC from the source laptop – chose to exclude from conversion

Options to choose/resize disks etc.

Job breakdown and monitor screen – this is where you can monitor the progress of the job – there is very little feedback on the console of either the source or target machines as part of this process.
The PlateSpin controller talks to ESX and creates blank VM that will become the target machine
![]()

PlateSpin boots the target VM into WinPE

Open console on the VM Platespin has created and you’ll see what it’s doing.
![]()
At this stage it has copied a WinPE.iso file to the ESX host and mounted it in the VM and boots the VM from it…

Target (blank) VM booting up, starting networking etc.

WinPE app contacts PowerConvert server via HTTP and downloads its job info


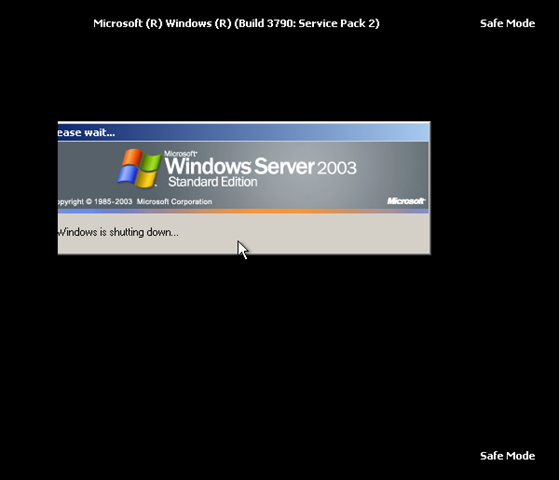
Once it’s finished copying data from the source to the target, it starts up in DS safe mode (as I’m P2V’ing a domain controller) – it seems to run some fix-up scripts in the background during this stage as it sits at the DS-safe mode logon prompt for a while before rebooting.


it’s done now, and rebooting out of DS safe mode.
Note, it uses GRUB in the process to control what is booted – this is cleaned up in the final stage.

1st normal boot

Ta-Da, all running with all services, databases and applications intact.

Completed job screen on the PlateSpin PowerConvert Client.
Note – that this “burns” one of the licences – you pay per conversion, unless you have a particular type of licence – full details and options here

The next post will be to take the virtual machine we have created via P2V and convert it back to a physical machine again (V2P). This is the clever bit that PlateSpin PowerConvert brings to the table over all other products on the market.
PlateSpin PowerConvert Part 1: Overview
Posted by on November 25, 2008
I sat the Certified PlateSpin Analyst (CPSA) course last week, and I have been experimenting with an evaluation version of PowerConvert 7.0 in my home lab so I thought I would write up a series of posts with a step by step guide on the P2V and V2P processes so you can see what this nifty application can do, in a later part I’ll look at the Workload protection feature for disaster recovery.
Platespin PowerConvert is now owned by Novell and the key thing to understand is its principal of “Workload portability”, where a “workload” is a server/application/data combination on a server or virtual machine.
PlateSpin use the term X2X to describe what it is capable of, and indeed it’s true it can do the traditional convert from a physical machine to a virtual machine (P2V) process like VMWare’s own convertor, but it can also go the other way and convert a virtual machine into an installation on a physical server (V2P) – it can accomplish this by maintaining a database of hardware and software specific drivers which are injected into the OS image when it is transferred to the target hardware.
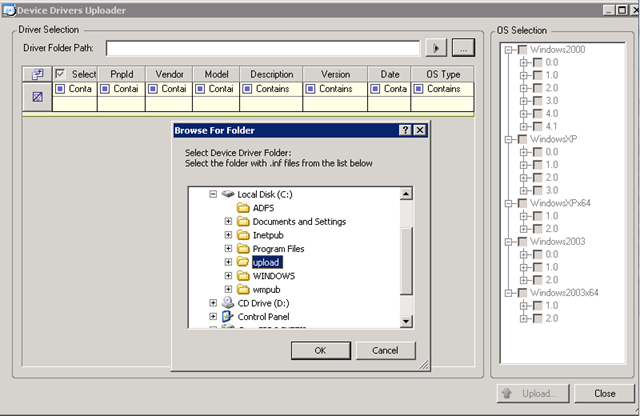
You can add your own drivers, and it’s very simple to use – I verified this as I added some HP BL460c drivers to the database, you simply extract the driver package from the vendor (which usually consists of .inf .sys files) and locate it via the “upload drivers” option, its then automatically imported into the database.

PowerConvert’s other party trick is V2V – where it can convert virtual machines between different hypervisors (VMWare ESX –> Xen or Microsoft Virtual Server –> ESX) this is useful if you maintain a heterogeneous environment.
All of this is achieved within the VM/OS itself; PowerConvert installs an agent inside the source and target machine or boots it from a WindowsPE/Linux boot CD (Cold Clone).
Once this process, known as “Take Control” has completed the PowerConvert server initiates a disk or file level clone of the source OS, applications and data direct from the source to the destination.
This is analogous to booting a virtual machine or physical server from a Linux/WinPE boot disk and running a disk imaging utility like Symantec Ghost, dd or ImageX – except rather than writing to an image file (although it does also support that too!) the image is written directly over the network to the disk of the target machine (virtual or physical) which is also booted into a Linux/WinPE boot disk.
During the transfer PowerConvert “injects” the appropriate hardware drivers into the OS image to support the target platform and removes the un-required drivers from the source server.
It is important to note that whilst PowerConvert can manipulate ESX servers directly to mount .ISO images to VMs it does not do anything directly with the .VMDK files; all the conversion occurs in-band within the virtual machine. This may seem a bit inefficient compared to VM Convertor but it is how it manages to achieved such flexibility in moving OS/App/Data images between so many different virtual and physical platforms.
It supports specific source/target OS’es – list here
PowerConvert and it’s sister product PowerRecon are key products in my internal cloud reference architecture as they are what enable you to be totally flexible in how you provision, change or decommission server instances by removing almost all dependencies on underlying hardware or hypervisor choices.

The next post will give a step by step guide to doing the P2V part of the conversion.
Platespin Power Convert – Installation problem – Error Running a Custom Action
Posted by on November 21, 2008
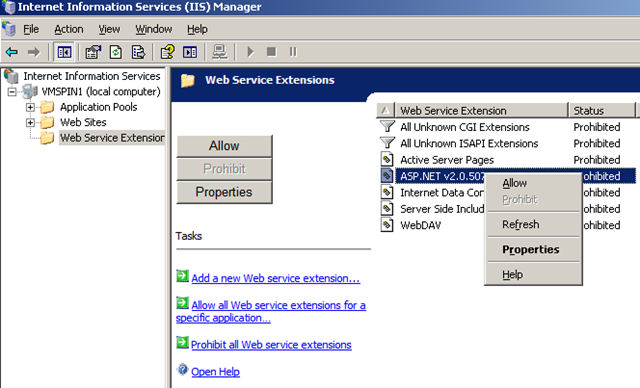
I’m working on a post around Platespin Power Convert, if you encounter the “Error running a custom action” message during installation (below) this post explains how to fix it.

first, make sure you have installed IIS and then .NET 2.0 (in that order, you will break it otherwise).
then if you get the above error you will likely have the following text in the PowerConvert_CustomActions.log file;
Updating IIS Script maps…
Setting security for the PowerConvert web directory
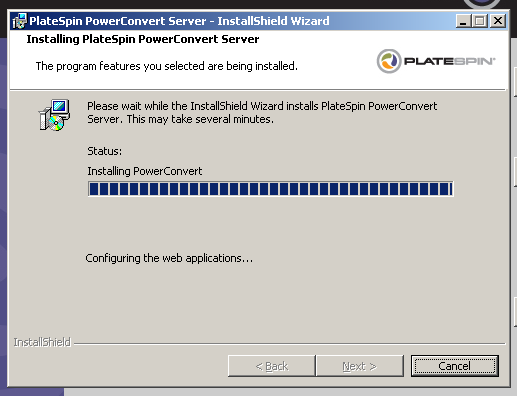
Configuring the web applications…
Error: System.Exception: Cannot connect to IIS with http or https…
at PlateSpin.Athens.Sdk.Server.ServerHelpers.GetAthensUrl(String athensName, CertificateWarnings certificateWarnings, String serverAddress)
at PlateSpin.Athens.Sdk.Server.ServerHelpers.GetLocalPowerConvertUrl(String powerConvertName, CertificateWarnings certificateWarnings)
at PlateSpin.Athens.Install.ProjectInstaller.setPowerConvertWebConfig(CertificateWarnings certificateWarning)
at PlateSpin.Athens.Install.ProjectInstaller.Install(IDictionary state)
Error: Cannot connect to IIS with http or https…
You need to enable the .Net 2.0 extensions (as per this thread)
![]()
That makes the installer a bit happier – the install screen is pretty good at detecting the other pre-requisites, would be handy if it did that one too!

Also another tip to speeding up the installation, particularly if you are installing PowerConvert in a VM is to extract the PowerConvert installation to a directory on the host machine (or elsewhere); otherwise the installer extracts a temporary copy inside the VM and then installs from it, which is a bit inefficient on space, especially if you are installing an eval copy inside a VM with a growable .vmdk file.
You can extract it by running the downloaded .EXE file PowerConvertSetup.EXE with a -x parameter, then choose the directory to extract to; then present this extracted directory into your VM/host to install which should give a directory structure like this

Novell Acquire Platespin
Posted by on February 29, 2008
As noted here and here, they’ve done it – lets hope they don’t stuff it up – Platespin have a good roadmap in my book – particularly around virtual DR/BC with their Forge product.
Novell had, and to some extent still do have very good technical products but they just make such a mess of integrating them all and making it easy to deploy and support which is one of the reasons MS beat them in the server wars…. the virtualization wars are the current battleground!
P2V Backup & Disaster Recovery
Posted by on February 20, 2008
There is a new site here (disclaimer: it does seem to be promoting a commercial service, but has some useful information that has been put into the public domain); describing some methods to roll your own P2V backup approach; I’ve not read in detail yet; but looks like Frane Borozan has solved some of the challenges I’ve encountered in the past automating the Free VMWare Convertor tool.
When I get some time I will revisit my build a better test lab series (and update it!) I hope to be able to integrate some of Frane’s ideas.
Thanks to Techhead for passing on the link; we worked together on the platform underlying the Build a better test lab series and he did a lot of work on the P2V and post-P2V automation tasks – he’s got a lot of handy scripts for doing this on an HP platform
Virtualized DR is going to be big this year; I have a long line of customers with this high on their list of priorities… Both for cross site 100% VMWare implementations and for the ability to backup/restore physical platforms to VMWare grid in a DR situation.
It just makes so much sense; no delay whilst racking & stacking recovery kit or problems restoring to different hardware etc. your admin’s can even do it from home – which can have some significant advantages in the event of a natural disaster like Katrina or floods like we had over the last couple of years in the UK
PlateSpin Forge is something we are seriously looking at as well as Symantec Backup Exec System Recovery Server Edition (who win a prize for extending the longest, most annoying product name! despite acquiring it from Veritas).
Will be an interesting year; I’m sure Sungard and all those recovery centre facilities will be moving to a grid/resource rental model rather than pure rack/floor space and retained hardware on-contract.

