Virtualization, Cloud, Infrastructure and all that stuff in-between
My ramblings on the stuff that holds it all together
Public Transport Layer for Google Maps
Posted by on January 14, 2009
This is quite a cool idea, a 3rd party has created a Google Maps overlay for public transport for many major cities. I live in London and this is especially useful as a visual aid to getting about (although I do know my way around pretty well) as you can see the mix of tube routes overlaid onto the streets – as almost all trips will be a tube/walking combination it gives a quick way to visualise where you are going.

Would be especially useful if this would work with the Blackberry Google Maps application that I use all the time but I can’t see a way to do that, overground rail networks and maybe bus routes would also be useful – but that would need a bit of detailed input from TfL (Transport for London) I would guess.
Manually Upgrading a Blackberry Pearl to 4.5, BIS & BES
Posted by on January 14, 2009
I have a Blackberry 8100 Pearl, it’s a great phone and I use it for both my corporate email via BES and my personal email via BIS so I have everything I need coming to one place (if you don’t know how to do this your BB will probably have an e-mail setup wizard where you can attach a number of different email services to your carrier’s BIS – on newer devices BIS and BES can co-exist, IIRC there used to be a specific BIS /or/ BES firmware – this no longer seems to be the case).
Because its attached-to/”owned” by a corporate BES I cannot install the normal 4.5 OS upgrades from my carrier myself as the Blackberry desktop software refuses to allow the 4.5 upgrade and says I have to have an administrator do it on my behalf or provide it over the air (OTA). Now, they are busy chaps and have better things to do and I really wanted HTML email support on my BB ASAP so a bit of unsupported DIY was in order;
Note: I actually did this during the xmas break so this is re-constructed from my memory – remember you do this at your own risk, particularly if your BB is supported by your internal IS department.. don’t make their lives difficult if you don’t know how to help yourself – Also, I don’t profess to be a Blackberry expert but I know enough to get by and work things out.
-
- I located the downloadable OS upgrade from my carrier
- I did a full backup of up my blackberry using the BB desktop software
- As my own Blackberry desktop software recognises my BB as being owned by a BES it won’t allow the upgrade via USB to the new firmware.
- I found a 2nd computer and installed the Blackberry desktop suite 4.7 but didn’t pair it up with my Blackberry {yet}
- I did a wipe of my BB handheld (via the Options/Security Options/General Settings UI. – warning this does wipe everything and took about 2hrs on my BB – note on mine it didn’t erase the contents on my microSD memory card; your mileage may vary and if you enforce encryption on external cards via policy then you may be unable to access the contents so best to back it up as well. in my case it has just a few un-important photographs from the camera stored on it.
- At this point I plugged the clean BB Pearl into the 2nd computer and paired it and upgraded the firmware from 4.2 to 4.5, which was pretty straightforward but took a couple of hours to complete.
- Once upgraded it was a clean BB, for reasons I don’t quite understand it tried to do an enterprise activation but failed, I restored my backup over the top of the clean phone and all my apps and data came back and the BES enterprise activation succeeded.
- I now had HTML email support via BES (as the back-end supported it)
- to get HTML email support for my personal email account via BIS I had to use the provisioning applet to have my carrier re-send the BIS service books, once complete it worked perfectly (more discussion on this here)
Once completed I garnished with a fresh looking theme from here, and it’s been more stable than ever since and I have nice, HTML formatted email rather than a mess of URL’s!
Problem Installing VMWare Workstation on Windows 7
Posted by on January 13, 2009
I have tried to install the most recent build of VMWare Workstation (6.5.1 build 126130) on my Windows 7 beta (build 7000) machine, and it fails with an error 1935 An Error occurred during the installation of assembly component {0BAE132A2- etc. etc. etc. HRESULT: 0x8007054F


Ah well, it’s still beta – guess there will be an updated build from VMWare at some point. This will prevent me from running Windows 7 on my main machine without some dual-booting 😦
Works perfectly the other way round (Windows 7 running as a VM under VM Workstation) so that will do for now.
Windows 7 and the Intel 855GM Video Driver "Solution"
Posted by on January 12, 2009
I’ve been playing about with Windows 7 in a VM for a while now in a VM, but now the beta is out I wanted to install it on a physical machine, I’m not ready yet to upgrade my main laptop to Windows 7 (although I have a cunning plan to p2v my Vista install and convert to a VHD so I can dual-boot that way which is a neat trick)
I have a Dell Inspiron 510m laptop that I use for testing things (I used it for my Patespin series) that I wanted to install Windows 7 on, it still gives pretty good performance and has 2Gb RAM – the installation itself went smoothly and quickly – less than 45mins from format to finished 1st boot, but it doesn’t detect the wireless or video card.
In my experience this isn’t that unusual for a Dell, although video did surprise me as Vista had a default driver for the Intel 855GM on-board video that worked well, there is no built-in driver in Windows 7 it would seem.
So, a bit of a problem – I’m stuck with 640×480 VGA mode which isn’t much use.
I tried several ways to hack the Vista version of the driver into my installation, all without success – it always defaulted back to the default VGA drivers, some discussion here if you are interested
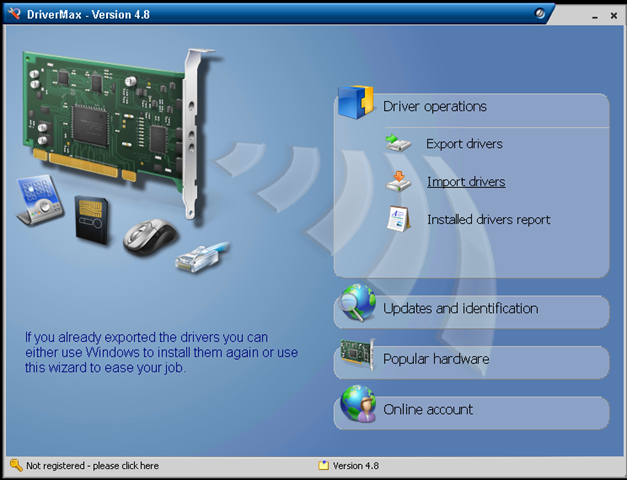
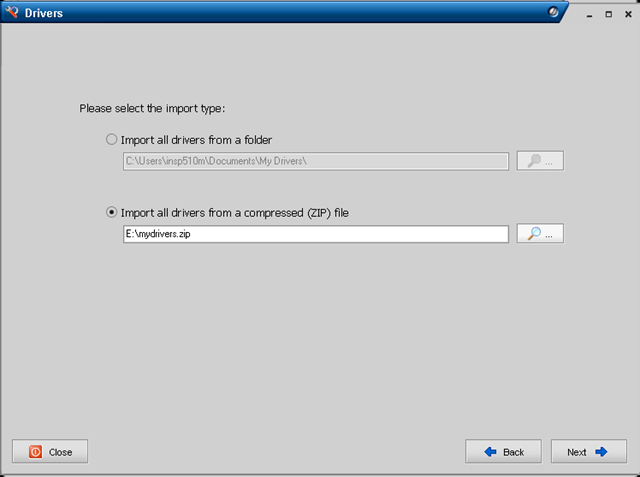
In the end I came across a post suggesting that I use an application called DriverMax – this is capable of exporting and importing installed drivers, I’d not tried it before but decided to give it a go, I know Vista had a working 855GM driver so the plan was to export it from there, and import it into a Windows 7 installation as I was unsure of how to extract it from the Vista installation media.
This necessitated a format and reinstall of the Dell 510m with Vista, which was painless enough as I had an auto-install DVD that I’d previously built
Once Vista was installed there was a working video driver running – I used DriverMax to export the working driver from the running OS – no source or driver CD required via a couple of clicks in the UI to a .zip file on a USB drive.
I then formatted and reinstalled Windows 7 again and on the laptop and installed DriverMax again.
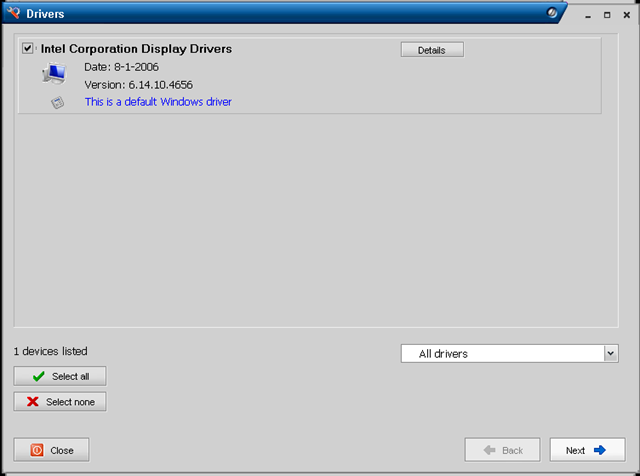
then I simply imported the driver from the .zip file
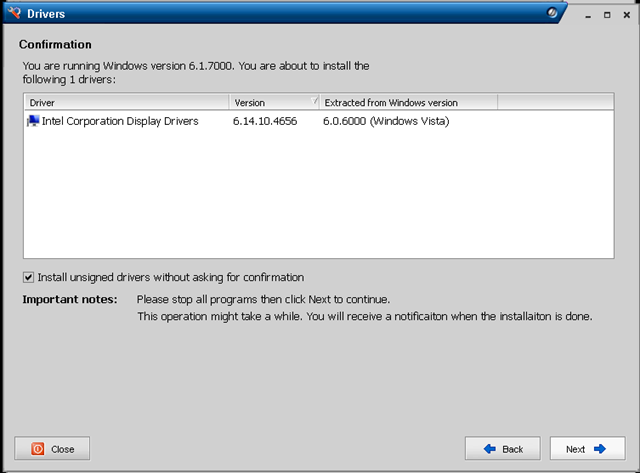
Note – it knows the driver I saved was a default Windows driver
Summary screen – important to note it can install unsigned drivers if required
After a reboot the Windows 7 installation is running with a working (full-res) video driver.
I did find one slight problem with DriverMax that I had to work-around, with the default VGA video driver the buttons on the dialog boxes were inaccessible and I couldn’t resize or hot-key around it to progress, so in the end I had to do the process via remote desktop to the Win7 machine from another machine on my network over a wired LAN connection!
It’s not an ideal solution as you have to have a working Vista installation to extract the driver from and is probably totally unsupported, this is essentially Windows 7 running a Vista video driver – but it’s a beta anyway, hopefully MS or Intel will ship an 855GM driver again when Windows 7 goes RTM.
My initial impressions are that Windows 7 seems a lot more responsive than Vista, although to be fair it’s a vanilla installation thus-far. I have high-hopes for the beta, by my reckoning the change in the code-base isn’t as fundamental as it was between XP and Vista so it’s more focused on incremental features and performance improvements. I ran beta copies of Vista on my main work machine from Beta 1 through to RTM without too many problems, maybe I’ll be confident enough to do that again this time around – the VHD booting feature is certainly compelling for what I do.
Amazon EC2 Web Console
Posted by on January 12, 2009
I’ve been doing a bit of playing about with Amazon’s EC2 cloud services recently, this is just a quick post with some screenshots of the new beta web console they have launched.
Up until now you had to control it via command line, or a firefox plug in – now Amazon have launched their own… seems very easy to use and understand – available online here

You can browse the list of pre-configured AMI’s (Amazon VM Images) and choose which ones you want to spin up.

I’m writing up some posts on using EC2 for quick ‘n’ dirty test and development environments, but I can see a lot of potential for this service to provide automated overspill capacity for applications using the automation API and some clever management tools.
What is the Cloud..?
Posted by on January 8, 2009
Following on from some discussion on Scott Lowe’s blog around the lack of a clear definition of cloud computing, I offer this as my opinion… it’s just that; and I’d welcome comments. I’m an infrastructure chap by trade but my motto is there are no apps without infrastructure, and this cloud stuff is all about making things easier for developers to create useful stuff quickly and cheaply but it needs somewhere to run.
Sam Johnstone has also done some work on formalising this stack, but I offer the following up for discussion.
A cloud is just a pool of flexible/on-demand “resource” a way of abstracting the underlying complexities of how things are executed or stored, provisioned etc.
This is analogous to the way the modern  computer, OS and applications have developed over the last 20 years into multiple abstraction layers – meaning a developer no longer has to explicitly know how to control devices at a low level, for example; moving bits in and out of registers, reading/writing sectors to disks. They make API calls down a stack to BIOS, firmware, operating systems, drivers, code libraries (.DLL etc.) and more recently moving to web services at the top level interface.
Presently solution/infrastructure architects work with individual servers, roles and services on bits of dedicated hardware which are often bound to a specific location, ensuring that they architect the solution to deliver the required level of availability, serviceability etc.
I see “the cloud” as a way of providing the next level of abstraction – with an eventual goal of architects being able to design systems with no roles or services tied to specific servers/databases/hardware/datacentres/continents(!) where SOA-type applications and transactions are executed across one or more cloud platforms without having to have a detailed understanding of the underlying infrastructure.
In the interim the cloud can deliver a platform to quickly deploy and change infrastructure to deliver applications, right-sizing capacity based on actual usage rather than over-sizing done early into the development cycle of an application.
Fewer hard physical ties to the local infrastructure that supports application components, combined with adoption of virtualization of servers, networks etc. means that you can relocate services locally, nationally or globally through data and configuration migration rather than a traditional lift & shift of servers, switches, SAN’s racks etc. with the associated risk and downtime etc.
With standardisation or adoption of a common infrastructure architecture this could allow for a real market place to develop, where the customer can choose the most appropriate or cost-effective region or service provider to run their application(s) – either based on the cost of local power, comms, or response time, legal jurisdiction or SLA without being tied to a specific service provider or physical location.
For example; some of my previous posts on this sort of physical DC portability are here, if you combine this with a high level of virtualization and the cloud reference architecture you have a compelling solution for large infrastructures, Zimory also have an interesting proposition for brokering resources between multiple cloud providers
There are two fundamental things required to deliver this nirvana…
1) Flexible Infrastructure Architecture (do-able now with current tech )
This is where I see my cloud reference architecture sitting, you could have multiple instances of this architecture split between on/off/3rd party premise providers – this provides a layer of abstraction between the physical hardware/networking/site world and an “application” or server instance (as it’s encapsulated in a VM – which is just persisted as a file on some storage.
2) Distributed Runtime/Services Layer (work starting now, needs development and standardisation)
To enable the cloud to really distribute applications (and thus computing power) across the Internet means you have to build a distributed or entirely democratic/autonomous controller mechanism (almost an OS for the cloud) which acts as a compiler, API, interpreter, Job Controller etc. to execute and manage applications (code/apps/scripts) that developers produce
This distributed runtime /services layer runs on server instances hosted on/in a cloud infrastructure (see item 1) that are managed by a service provider, to my mind there is no other way to achieve this you can’t easily write an app and just have it run across multiple locations without some kind of underlying abstraction layer taking care of the complexities of state, storage, parallelism etc. this is where Microsoft’s Azure, Amazon AWS & Google have API’s for things like databases , payment gateways, messaging, storage across their distributed infrastructures.
However all of them are doing it in a proprietary way – Azure/AWS provide their own API rather than a standardised set of services that true cloud apps can be written to and then moved between various cloud infrastructures or providers.

It’s important to note that the two are not mutually exclusive, clouds based on this reference architecture can still run traditional static one server/one app type services, even desktop/VDI but it also maintains server instances that run the actual distributed runtime/services layer for applications that are written to take advantage of it – there is a common underlying platform.
This model and standardisation helps address the concerns of most businesses when they start to talk about clouds, data ownership and security by giving them the opportunity to selectively adopt cloud technologies and transition workloads between on/off-premise clouds as needs dictate.
And so begins 2009..
Posted by on January 5, 2009
Ok, well it was last week 🙂 apologies for the lack of postings in the last month which was due to a mix of well-earnt holiday and some very busy periods of work in the December run-down.
Anyways, I would like to wish all vinf.net readers a belated happy new year; I’ve been amazed at how much this blog has grown over the last year, since my last review its now topped 120k hits – and (un)interesting factoid; Thursdays are consistently the most busy day for traffic!
Rest assured I haven’t been idle in the month’s absence from blogging. I have a number of interesting posts in the pipeline, continuing my PlateSpin power convert series (with the new product names/line-up that was announced in the meantime!) and fleshing out my cloud reference architecture, VMWare vCloud, Amazon EC2 and some further work on cheap ESX PC solutions for home/labs.
In other news, VMWare have kindly offered* me a press pass to VMWorld Europe in Feb which I’m honoured to accept and will hopefully be following Scott’s example by blogging extensively before, during and after; although I’ll probably stick to a day by day summary like I did for TechEd last year and break out any specific areas of detailed interest into separate posts so that they get the attention and level of detail required.
I’ve also submitted for a number of presenter sessions so fingers crossed they’ll be accepted.
2009 looks to be a very interesting year for the virtualization industry with increased adoption and considering the current economic climate maybe the VI suite should be renamed the Credit Crunch Suite rather than vSphere as more and more companies consolidate and virtualize to save money 🙂
Cloud computing also looks to be big this year and I’m hoping to be very active in this area, building on the work I did last year taking a more practical/infrastructure position on adoption, hopefully I will have some exciting announcements on this front in the coming months.
*In terms of disclosure, VMWare have offered me a free conference ticket in exchange for my coverage – there is absolutely no stipulation on positive/biased content so I’ll be free as ever to give my opinion, my employer is likely to be covering my travel expenses for the event as I was going to be attending anyway.
Platespin PowerConvert Part 3: V2P
Posted by on December 1, 2008
Following on from the 2nd part of this series, I’ll now show how we can take the AD/Exchange virtual machine that we have created from a physical server via P2V and convert it back to a different physical machine (V2P) using PlateSpin PowerConvert.
The original source machine was a Dell Inspiron 510m laptop, and the target machine we will be using in this instance is a Dell Latitude D510; this wouldn’t typically work if we were to use a normal disk imaging approach as products like Ghost etc. can’t inject the correct boot time and drivers to make it work.
PowerConvert, however can which is very clever IMHO.
Note, for this part I will use the following convention:
Source Machine – virtual machine running on ESX (previously P2V’d from a physical machine)
Target machine – Dell Latitude D510 laptop
The following diagram shows my lab setup;

More specific details on the TCP/IP ports used by PlateSpin PowerConvert can be found here.
Because of where I am trying this I don’t have a wired connection back to my ESX box – so I am using the bridge connections feature of Vista on my laptop to provide the networking for the target machine – this is just a peculiarity of where my study is as I’ve not got round to getting a wired GigE connection here from my ESX rack.
To begin with we need to boot the target machine from a WinPE CD that PlateSpin PowerConvert prepares, these are downloadable from Platespin.com; In this instance I’m using the following downloaded .ISO file.
PlateSpin PowerConvert 7.0 Physical Target Take Control ISO For Low Memory Servers – [WINPE.ISO]
Use this ISO image for servers with low memory, between 256 MB and 384 MB.Currently, target physical servers must have at least 256 MB of RAM
The target machine only has 256Mb of RAM, so it won’t break any records for performance with Exchange & AD running and will need to use the low-memory version of the boot CD.
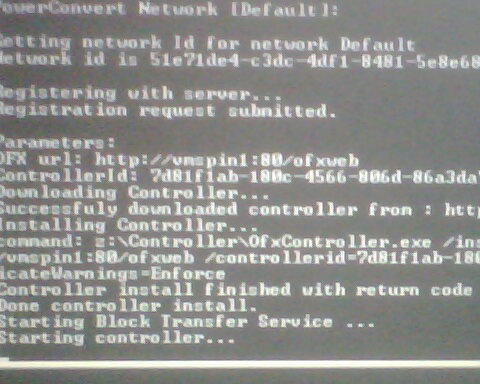
You boot the target machine from the CD, you are prompted to enter the URL to the powerconvert server which is in the format http://<servername>/powerconvert
And then some server credentials and IP address details, it will then contact the PowerConvert server and register itself (apologies for poor quality pic – cameraphone!)
Once it’s registered itself with the PowerConvert server it will show up in the servers view as below.
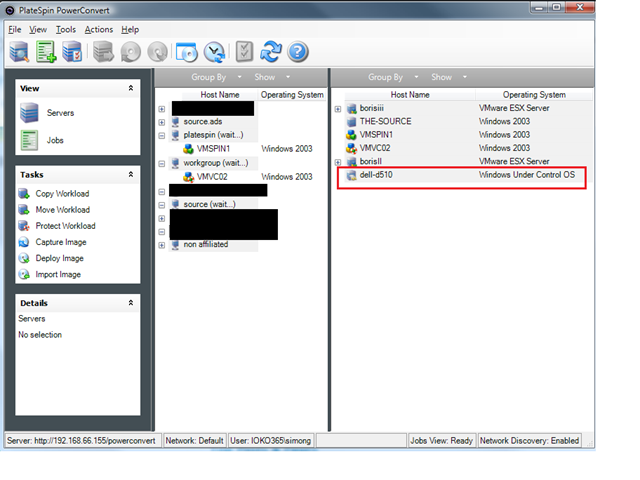
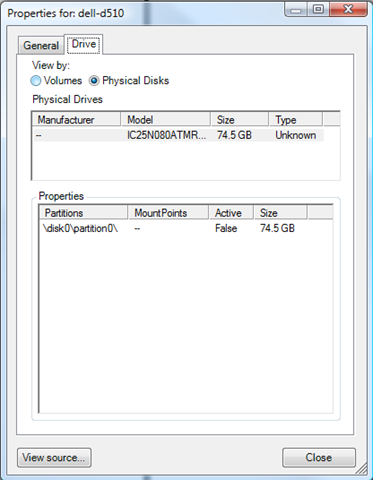
You can look at its properties as it’s been “discovered” as part of this process.

In this instance we want to move the installation from the source to the target – for example if we found performance under a VM was not satisfactory or had a software problem that the vendor will only support if it can be reproduced on physical hardware, this gives us the job setup displayed below (essentially the reverse of part 2 in this series – P2V).
Make sure you choose the discovered source OS (hint: refresh it if it’s still in the DB as a physical machine), rather than the VM under the ESX tree
The target machine can now have source machines (left hand pane) dragged and dropped onto it to start a new conversion job.
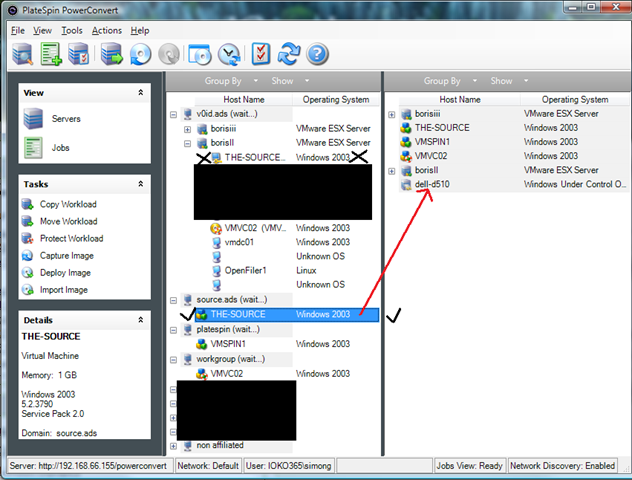
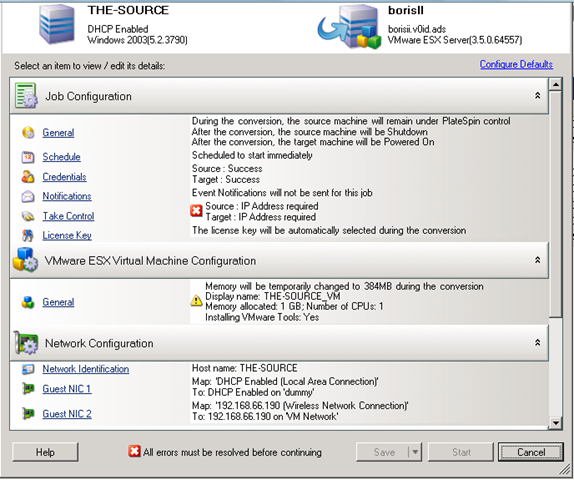
Clicking “Advanced” brings up the following screen, any red X means a setting needs to be changed before you can proceed.

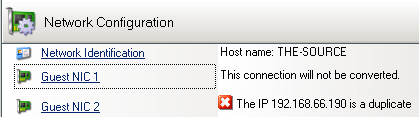
Note – we want to do an online snapshot based transfer to minimise downtime and support moving the AD/Exchange installation as-is and shutdown the source machine (otherwise we will have IP address and name conflicts) when the target machine boots.

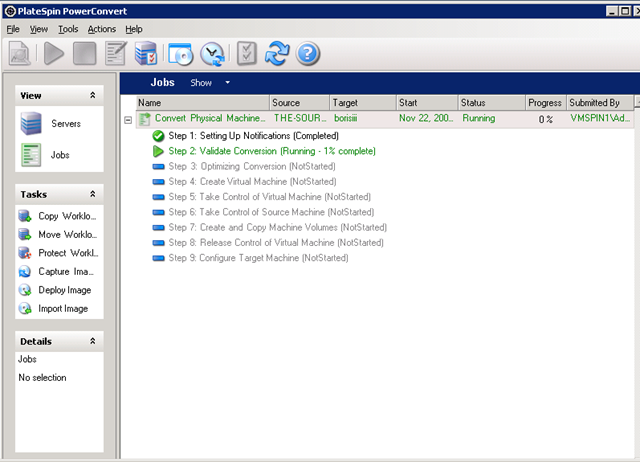
Ok, so here we go, nothing up this sleeve, nothing up this sleeve 🙂 Job submitted & running;
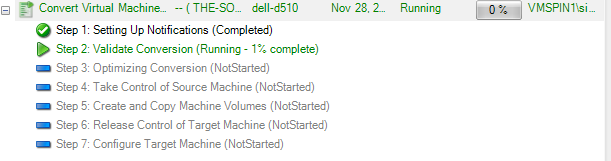
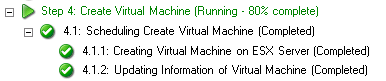
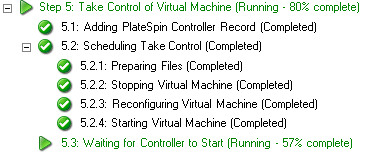
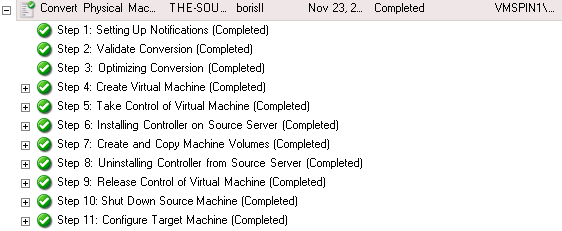
At this point I walked away and had some lunch 🙂 an hour later it was finished and the Dell laptop was running the Windows 2003 DC and Exchange server, all intact and totally hands-off – very impressive, this is the breakdown of job steps shown in the final report.

Once I’d logged on there were a few new hardware found dialogs for things like the on-board modem and video card as I’d not uploaded the drivers beforehand to let Platespin take care of it.
NIC IP settings, everything were applied to the new NIC and the laptop is now running the OS and app “workload” that was previously a virtual machine.

Very impressive – I’ve got some other spare hardware in the lab so I’m also going to try V2P to some even more different hardware – I have a quad CPU ML570g1 – so if I can get that going again (its been switched off since I migrated my VM labs to D530’s) I’ll give that a go too just to really push it; as I realise the source and target machines were sort of similar Dell models in this instance.
![]()
All in this conversion took less than an hour and considering the network transfer was bridging over a 54g wireless connection and the source VM was just running on a cheap D530 ESX box I think that’s pretty good going!
Next up we will take a look at Workload Protection, which leverages the X2X functionality we’ve seen so far to keep a sync’d up clone of a production server (VM or physical) to a virtual machine for disaster recovery.
Platespin PowerConvert Part 2: P2V
Posted by on November 26, 2008
Following on from the previous overview post, My goal here is to do a live P2V of a Windows 2003 Server installation on an old laptop into a virtual machine running on my D530 ESX farm, and just to make things “interesting” the laptop is also running Exchange 2003 🙂
And once this is completed I’ve got a 2nd laptop to which I want to convert the virtual machine onto (V2P).
I’ve implemented PowerConvert in a VM, and all hosts are connected over a gigabit ethernet switch (although the source laptop only has a 10/100 NIC.
I’m aiming to use the live transfer (with snapshot) feature which handles clean-snapshots of all the Exchange and AD databases using Windows Volume Shadow Services (VSS).
The initial screen is below, to get to this stage you need to discover hosts – which can be done via IP address, hostname or network discovery (via listening to broadcasts) – it’s recommended that you discover/refresh each source and target server before doing any migrations – the data is held in an internal MSDE database and is not automatically refreshed.

Select the source and right-click – or you can drag and drop it to the target (i.e physical server booted from a “Take Control” CD or host running a supported (and previously discovered) Hypervisor.

It detects that Exchange is installed on the source
![]()

Advanced view; note red X marks areas that need attention.
Choose which type of transfer
Take Control – “Cold clone” boot source from custom WinPE CD.
Live – File based (file by file copy, suitable for simple servers)
Live – Block Based (faster than file-copy)
Live – Snapshot (uses VSS, supported for applications like Exchange, SQL etc.)
Note the options for what to do with the source machine once the conversion has completed; if you are doing a move like we are you don’t want the source machine left on the network as you will have an IP/name conflict or worse users changing data – so shut it down.

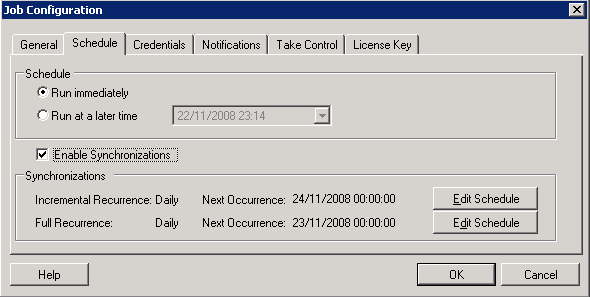
Synchronisation options, handy if you have a lot of data to migrate and want to prep the target some time ahead of a cut-over.
Also used by the workload protection feature (x2V DR) – which is very cool and will be the subject of a future post.
This is an annoying bit where it doesn’t automatically adjust the path to the VM files if you change the virtual machine name – so make sure you edit the path manually as required.

You can choose target resource pool on an ESX server; but as far as I can tell it’s not specifically aware of DRS, virtual centre or different clusters – it’s host only driven.

Moving from single CPU Physical box to dual CPU VM (and vice-versa) is just a check-box.

Note this will replace a file; which is the multiprocessor HAL due to the above option.

An option to sysprep/rename etc. the clone (not used here as we are “moving” i.e decommissioning the source machine)

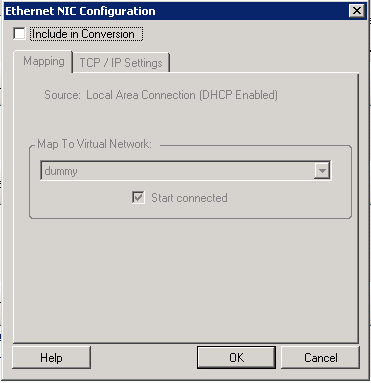
Picked up an unused NIC from the source laptop – chose to exclude from conversion

Options to choose/resize disks etc.

Job breakdown and monitor screen – this is where you can monitor the progress of the job – there is very little feedback on the console of either the source or target machines as part of this process.
The PlateSpin controller talks to ESX and creates blank VM that will become the target machine
![]()
PlateSpin boots the target VM into WinPE

Open console on the VM Platespin has created and you’ll see what it’s doing.
![]()
At this stage it has copied a WinPE.iso file to the ESX host and mounted it in the VM and boots the VM from it…

Target (blank) VM booting up, starting networking etc.

WinPE app contacts PowerConvert server via HTTP and downloads its job info


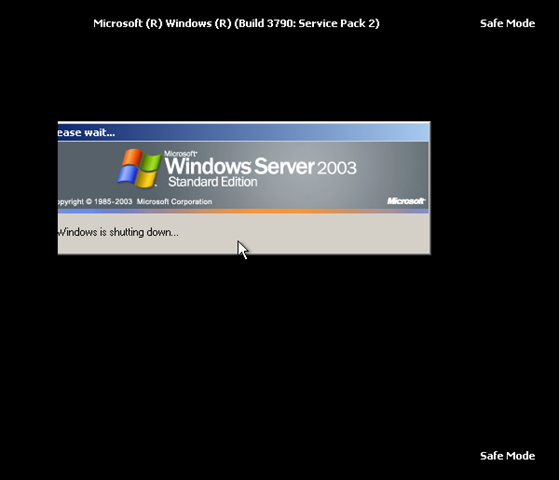
Once it’s finished copying data from the source to the target, it starts up in DS safe mode (as I’m P2V’ing a domain controller) – it seems to run some fix-up scripts in the background during this stage as it sits at the DS-safe mode logon prompt for a while before rebooting.


it’s done now, and rebooting out of DS safe mode.
Note, it uses GRUB in the process to control what is booted – this is cleaned up in the final stage.

1st normal boot

Ta-Da, all running with all services, databases and applications intact.

Completed job screen on the PlateSpin PowerConvert Client.
Note – that this “burns” one of the licences – you pay per conversion, unless you have a particular type of licence – full details and options here

The next post will be to take the virtual machine we have created via P2V and convert it back to a physical machine again (V2P). This is the clever bit that PlateSpin PowerConvert brings to the table over all other products on the market.
PlateSpin PowerConvert Part 1: Overview
Posted by on November 25, 2008
I sat the Certified PlateSpin Analyst (CPSA) course last week, and I have been experimenting with an evaluation version of PowerConvert 7.0 in my home lab so I thought I would write up a series of posts with a step by step guide on the P2V and V2P processes so you can see what this nifty application can do, in a later part I’ll look at the Workload protection feature for disaster recovery.
Platespin PowerConvert is now owned by Novell and the key thing to understand is its principal of “Workload portability”, where a “workload” is a server/application/data combination on a server or virtual machine.
PlateSpin use the term X2X to describe what it is capable of, and indeed it’s true it can do the traditional convert from a physical machine to a virtual machine (P2V) process like VMWare’s own convertor, but it can also go the other way and convert a virtual machine into an installation on a physical server (V2P) – it can accomplish this by maintaining a database of hardware and software specific drivers which are injected into the OS image when it is transferred to the target hardware.
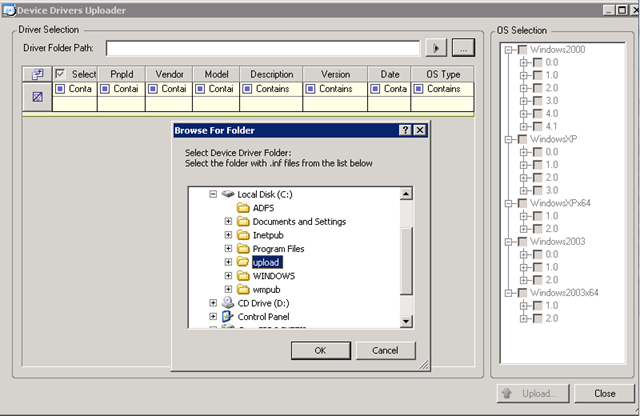
You can add your own drivers, and it’s very simple to use – I verified this as I added some HP BL460c drivers to the database, you simply extract the driver package from the vendor (which usually consists of .inf .sys files) and locate it via the “upload drivers” option, its then automatically imported into the database.

PowerConvert’s other party trick is V2V – where it can convert virtual machines between different hypervisors (VMWare ESX –> Xen or Microsoft Virtual Server –> ESX) this is useful if you maintain a heterogeneous environment.
All of this is achieved within the VM/OS itself; PowerConvert installs an agent inside the source and target machine or boots it from a WindowsPE/Linux boot CD (Cold Clone).
Once this process, known as “Take Control” has completed the PowerConvert server initiates a disk or file level clone of the source OS, applications and data direct from the source to the destination.
This is analogous to booting a virtual machine or physical server from a Linux/WinPE boot disk and running a disk imaging utility like Symantec Ghost, dd or ImageX – except rather than writing to an image file (although it does also support that too!) the image is written directly over the network to the disk of the target machine (virtual or physical) which is also booted into a Linux/WinPE boot disk.
During the transfer PowerConvert “injects” the appropriate hardware drivers into the OS image to support the target platform and removes the un-required drivers from the source server.
It is important to note that whilst PowerConvert can manipulate ESX servers directly to mount .ISO images to VMs it does not do anything directly with the .VMDK files; all the conversion occurs in-band within the virtual machine. This may seem a bit inefficient compared to VM Convertor but it is how it manages to achieved such flexibility in moving OS/App/Data images between so many different virtual and physical platforms.
It supports specific source/target OS’es – list here
PowerConvert and it’s sister product PowerRecon are key products in my internal cloud reference architecture as they are what enable you to be totally flexible in how you provision, change or decommission server instances by removing almost all dependencies on underlying hardware or hypervisor choices.

The next post will give a step by step guide to doing the P2V part of the conversion.

